Siege Mechanics: Difference between revisions
CptTwinkie (talk | contribs) mNo edit summary |
CptTwinkie (talk | contribs) mNo edit summary |
||
| (2 intermediate revisions by the same user not shown) | |||
| Line 1: | Line 1: | ||
{{SEO|image_url=https://mec-wiki-media.storage.googleapis.com/images/4/4a/AdvancedMechanics.png|description=A set of mechanisms used for building engines of war.}} | |||
{{Thumbnail|AdvancedMechanics.png|Siege Mechanics}} | {{Thumbnail|AdvancedMechanics.png|Siege Mechanics}} | ||
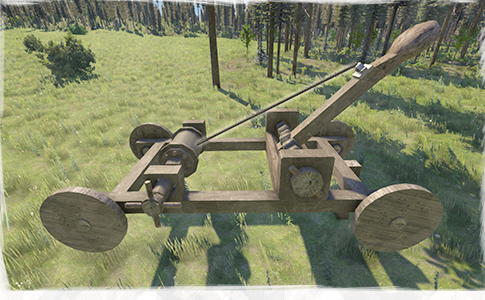
<i>"A set of mechanisms used for building engines of war."</i> | <i>"A set of mechanisms used for building engines of war. | ||
Catapult buckets and torsion springs make siege equipment even easier to produce."</i> | |||
{{Version <!-- Do not change the version until the entire page is up-to-date --> | {{Version <!-- Do not change the version until the entire page is up-to-date --> | ||
|release=0|major=6}} | |release=0|major=7|minor=X}} | ||
{{HistoryId|0.6.4|16501|0.6|15208}} | |||
<!-- Start exported template data. Please do not edit this section --> | <!-- Start exported template data. Please do not edit this section --> | ||
| Line 13: | Line 17: | ||
{{Table-Cell|}} | {{Table-Cell|}} | ||
{{Table-End}} | {{Table-End}} | ||
|tag= | |tag=Research | ||
Research | |||
|branch=military | |branch=military | ||
|unlocks= | |unlocks= | ||
| Line 23: | Line 26: | ||
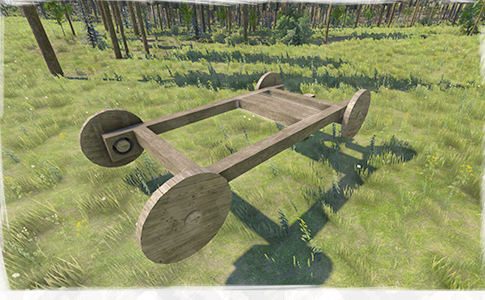
===Step 1=== | ===Step 1=== | ||
Engines of war are some of the most complex constructions in Medieval Engineers. Let's start with the simplest of them, a catapult. You will need to build a cart chassis first. Gather the parts needed to build a chassis. | Engines of war are some of the most complex constructions in Medieval Engineers. Let's start with the simplest of them, a catapult. You will need to build a cart chassis first. Gather the parts needed to build a chassis. | ||
: Obtain | : • Obtain 7x Timber (0/7) | ||
: Obtain | : • Obtain 4x Catch Block (0/4) | ||
: Obtain | : • Obtain 4x Wheel (0/4) | ||
===Step 2=== | ===Step 2=== | ||
Place a Timber | Place a Timber vertically into ground to hold your chassis above the ground while you build. Then place a Timber horizontally on side of first timber. | ||
See the example image in the quest journal ({{Key|j}}). | See the example image in the quest journal ("{{Key|j}}"). | ||
: Place | : • Place 2x Timber (0/2) | ||
[[File:MilitaryAdvancedMechanics_01.png]] | [[File:MilitaryAdvancedMechanics_01.png]] | ||
===Step 3=== | ===Step 3=== | ||
Place a Timber 8 on each end of the horizontal timber 10 at 90 degree angles. Use 2 Timber 8 to extend the ones you just placed. Connect the ends of the new timbers together with another Timber 8 to make a large rectangle. | Place a Timber 8 on each end of the horizontal timber 10 at 90 degree angles. Use 2 Timber 8 to extend the ones you just placed. Connect the ends of the new timbers together with another Timber 8 to make a large rectangle. | ||
See the example image in the quest journal ({{Key|j}}). | See the example image in the quest journal ("{{Key|j}}"). | ||
: Place | : • Place 5x Timber 8 (0/5) | ||
[[File:MilitaryAdvancedMechanics_02.png]] | [[File:MilitaryAdvancedMechanics_02.png]] | ||
===Step 4=== | ===Step 4=== | ||
Place Catch Blocks on each corner. | Place Catch Blocks on each corner. | ||
See the example image in the quest journal ({{Key|j}}). | See the example image in the quest journal ("{{Key|j}}"). | ||
: Place | : • Place 4x Catch Block (0/4) | ||
[[File:MilitaryAdvancedMechanics_03.png]] | [[File:MilitaryAdvancedMechanics_03.png]] | ||
===Step 5=== | ===Step 5=== | ||
Add a wheel to the outside of each catch block. Rotate the wheels so that the braces face toward the cart. | Add a wheel to the outside of each catch block. Rotate the wheels so that the braces face toward the cart. | ||
See the example image in the quest journal ({{Key|j}}). | See the example image in the quest journal ("{{Key|j}}"). | ||
: Place | : • Place 4x Wheel (0/4) | ||
[[File:MilitaryAdvancedMechanics_04.png]] | [[File:MilitaryAdvancedMechanics_04.png]] | ||
===Step 6=== | ===Step 6=== | ||
Now that you have the chassis finished, gather the parts needed to build a throwing mechanism. | Now that you have the chassis finished, gather the parts needed to build a throwing mechanism. | ||
: Obtain | : • Obtain 4x Timber (0/4) | ||
: Obtain | : • Obtain 1x Rope Eye Plate (0/1) | ||
: Obtain | : • Obtain 1x Rope Torsion Spring (0/1) | ||
: Obtain | : • Obtain 1x Catapult Bucket (0/1) | ||
===Step 7=== | ===Step 7=== | ||
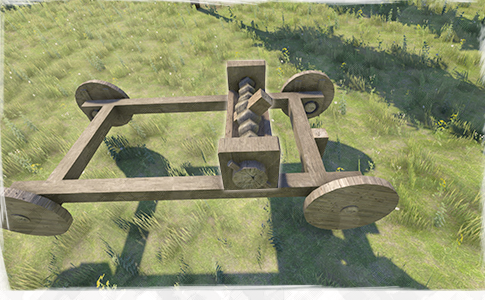
Place 3 Timber 8 inside the chassis 3 space from one end to build a small platform. Place a Rope Torsion Spring on top of this platform. | Place 3 Timber 8 inside the chassis 3 space from one end to build a small platform. Place a Rope Torsion Spring on top of this platform. | ||
See the example images in the quest journal ({{Key|j}}). | See the example images in the quest journal ("{{Key|j}}"). | ||
: Place | : • Place 3x Timber 8 (0/3) | ||
: Place | : • Place 1x Rope Torsion Spring (0/1) | ||
[[File:MilitaryAdvancedMechanics_05.png]] | [[File:MilitaryAdvancedMechanics_05.png]] | ||
[[File:MilitaryAdvancedMechanics_06.png]] | [[File:MilitaryAdvancedMechanics_06.png]] | ||
| Line 68: | Line 71: | ||
===Step 8=== | ===Step 8=== | ||
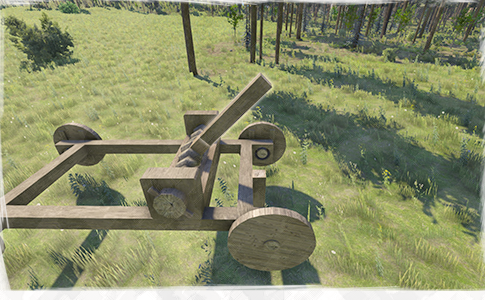
Make sure the small timber protruding from the Rope Torsion Spring points at the closest end of the chassis. Attach a Timber 6 to the protruding timber. | Make sure the small timber protruding from the Rope Torsion Spring points at the closest end of the chassis. Attach a Timber 6 to the protruding timber. | ||
See the example image in the quest journal ({{Key|j}}). | See the example image in the quest journal ("{{Key|j}}"). | ||
: Place | : • Place 1x Timber 6 (0/1) | ||
[[File:MilitaryAdvancedMechanics_07.png]] | [[File:MilitaryAdvancedMechanics_07.png]] | ||
===Step 9=== | ===Step 9=== | ||
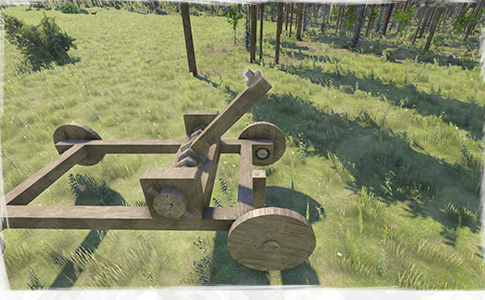
This will function as the throwing arm. You will need a way to pull the arm back. Place a Rope Eye Plate on top of the new timber at the end. | This will function as the throwing arm. You will need a way to pull the arm back. Place a Rope Eye Plate on top of the new timber at the end. | ||
See the example image in the quest journal ({{Key|j}}). | See the example image in the quest journal ("{{Key|j}}"). | ||
: Place | : • Place 1x Rope Eye Plate (0/1) | ||
[[File:MilitaryAdvancedMechanics_08.png]] | [[File:MilitaryAdvancedMechanics_08.png]] | ||
===Step 10=== | ===Step 10=== | ||
Place a Catapult Bucket on the end of the throwing arm. Make sure the opening faces down. | Place a Catapult Bucket on the end of the throwing arm. Make sure the opening faces down. | ||
See the example image in the quest journal ({{Key|j}}). | See the example image in the quest journal ("{{Key|j}}"). | ||
: Place | : • Place 1x Catapult Bucket (0/1) | ||
[[File:MilitaryAdvancedMechanics_09.png]] | [[File:MilitaryAdvancedMechanics_09.png]] | ||
===Step 11=== | ===Step 11=== | ||
Now that the throwing mechanism is finished, gather the parts needed to build a loading mechanism. | Now that the throwing mechanism is finished, gather the parts needed to build a loading mechanism. | ||
: Obtain | : • Obtain 1x Rope Drum (0/1) | ||
: Obtain | : • Obtain 1x Catch Block (0/1) | ||
: Obtain | : • Obtain 1x Hand Crank Wheel (0/1) | ||
===Step 12=== | ===Step 12=== | ||
On the end of the chassis farthest from the throwing mechanism, place an Extended Catch Block and a One-Sided Catch block. These should go on top of the chassis 2 spaces from the end. | On the end of the chassis farthest from the throwing mechanism, place an Extended Catch Block and a One-Sided Catch block. These should go on top of the chassis 2 spaces from the end. | ||
See the example image in the quest journal ({{Key|j}}). | See the example image in the quest journal ("{{Key|j}}"). | ||
: Place | : • Place 1x Extended Catch Block (0/1) | ||
[[File:MilitaryAdvancedMechanics_10.png]] | [[File:MilitaryAdvancedMechanics_10.png]] | ||
===Step 13=== | ===Step 13=== | ||
Place a Lockable Rope Drum between the catch blocks. | Place a Lockable Rope Drum between the catch blocks. | ||
See the example image in the quest journal ({{Key|j}}). | See the example image in the quest journal ("{{Key|j}}"). | ||
: Place | : • Place 1x Lockable Rope Drum (0/1) | ||
[[File:MilitaryAdvancedMechanics_11.png]] | [[File:MilitaryAdvancedMechanics_11.png]] | ||
===Step 14=== | ===Step 14=== | ||
Place a Hand Crank Wheel on the outside of the Extended Catch Block. | Place a Hand Crank Wheel on the outside of the Extended Catch Block. | ||
See the example image in the quest journal ({{Key|j}}). | See the example image in the quest journal ("{{Key|j}}"). | ||
: Place | : • Place 1x Hand Crank Wheel (0/1) | ||
[[File:MilitaryAdvancedMechanics_12.png]] | [[File:MilitaryAdvancedMechanics_12.png]] | ||
===Step 15=== | ===Step 15=== | ||
You will need to attach the Lockable Rope Drum to the Rope Eye Plate on the throwing arm using a Basic Rope. Lock the rope drum and turn the hand crank to pull back the arm. Place something in the bucket and unlock the rope drum to fire the catapult. You only need to invent some munitions and you're ready to siege castles! | You will need to attach the Lockable Rope Drum to the Rope Eye Plate on the throwing arm using a Basic Rope. Lock the rope drum and turn the hand crank to pull back the arm. Place something in the bucket and unlock the rope drum to fire the catapult. You only need to invent some munitions and you're ready to siege castles! | ||
See the example image in the quest journal ({{Key|j}}). | See the example image in the quest journal ("{{Key|j}}"). | ||
: Obtain | : • Obtain 1x Basic Ropes (0/1) | ||
[[File:MilitaryAdvancedMechanics_13.png]] | [[File:MilitaryAdvancedMechanics_13.png]] | ||
<!-- End exported template data --> | <!-- End exported template data --> | ||
Latest revision as of 17:59, 18 July 2022
"A set of mechanisms used for building engines of war.
Catapult buckets and torsion springs make siege equipment even easier to produce."
| Version: | 0.7 |
| History: | 0.6.4 → 0.6 |
Quest Information
Quests Required to Unlock This Quest
Type of Quest
Research Branch
Items Unlocked
Quest Steps
Step 1
Engines of war are some of the most complex constructions in Medieval Engineers. Let's start with the simplest of them, a catapult. You will need to build a cart chassis first. Gather the parts needed to build a chassis.
- • Obtain 7x Timber (0/7)
- • Obtain 4x Catch Block (0/4)
- • Obtain 4x Wheel (0/4)
Step 2
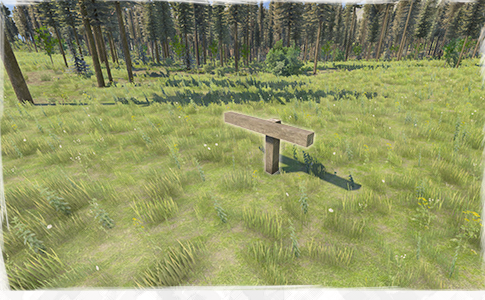
Place a Timber vertically into ground to hold your chassis above the ground while you build. Then place a Timber horizontally on side of first timber.
See the example image in the quest journal ("![]() ").
").
- • Place 2x Timber (0/2)
Step 3
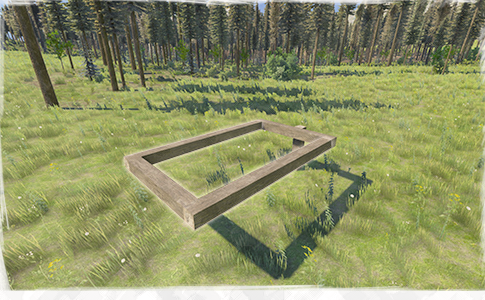
Place a Timber 8 on each end of the horizontal timber 10 at 90 degree angles. Use 2 Timber 8 to extend the ones you just placed. Connect the ends of the new timbers together with another Timber 8 to make a large rectangle.
See the example image in the quest journal ("![]() ").
").
- • Place 5x Timber 8 (0/5)
Step 4
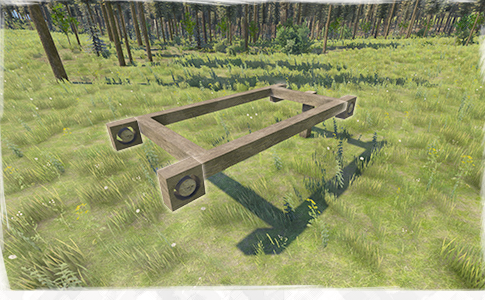
Place Catch Blocks on each corner.
See the example image in the quest journal ("![]() ").
").
- • Place 4x Catch Block (0/4)
Step 5
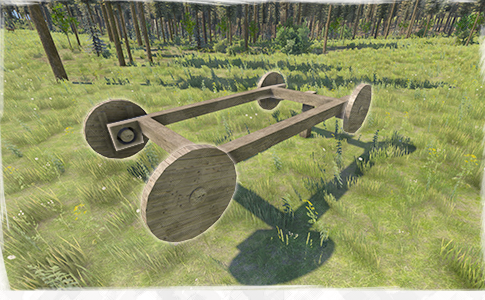
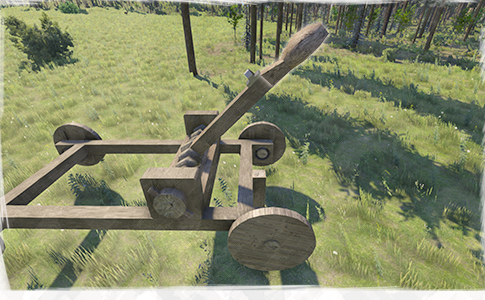
Add a wheel to the outside of each catch block. Rotate the wheels so that the braces face toward the cart.
See the example image in the quest journal ("![]() ").
").
- • Place 4x Wheel (0/4)
Step 6
Now that you have the chassis finished, gather the parts needed to build a throwing mechanism.
- • Obtain 4x Timber (0/4)
- • Obtain 1x Rope Eye Plate (0/1)
- • Obtain 1x Rope Torsion Spring (0/1)
- • Obtain 1x Catapult Bucket (0/1)
Step 7
Place 3 Timber 8 inside the chassis 3 space from one end to build a small platform. Place a Rope Torsion Spring on top of this platform.
See the example images in the quest journal ("![]() ").
").
- • Place 3x Timber 8 (0/3)
- • Place 1x Rope Torsion Spring (0/1)
Step 8
Make sure the small timber protruding from the Rope Torsion Spring points at the closest end of the chassis. Attach a Timber 6 to the protruding timber.
See the example image in the quest journal ("![]() ").
").
- • Place 1x Timber 6 (0/1)
Step 9
This will function as the throwing arm. You will need a way to pull the arm back. Place a Rope Eye Plate on top of the new timber at the end.
See the example image in the quest journal ("![]() ").
").
- • Place 1x Rope Eye Plate (0/1)
Step 10
Place a Catapult Bucket on the end of the throwing arm. Make sure the opening faces down.
See the example image in the quest journal ("![]() ").
").
- • Place 1x Catapult Bucket (0/1)
Step 11
Now that the throwing mechanism is finished, gather the parts needed to build a loading mechanism.
- • Obtain 1x Rope Drum (0/1)
- • Obtain 1x Catch Block (0/1)
- • Obtain 1x Hand Crank Wheel (0/1)
Step 12
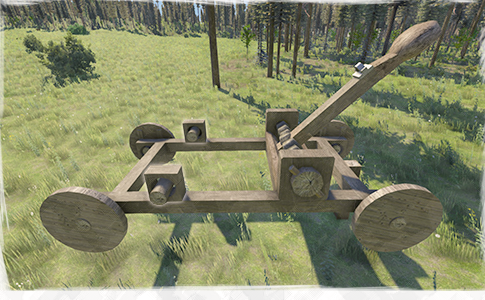
On the end of the chassis farthest from the throwing mechanism, place an Extended Catch Block and a One-Sided Catch block. These should go on top of the chassis 2 spaces from the end.
See the example image in the quest journal ("![]() ").
").
- • Place 1x Extended Catch Block (0/1)
Step 13
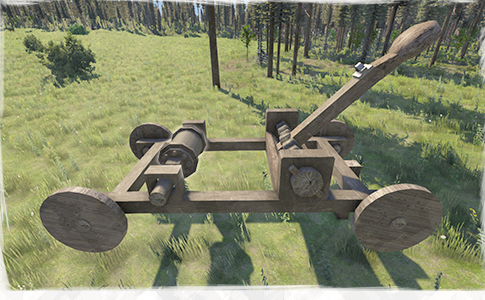
Place a Lockable Rope Drum between the catch blocks.
See the example image in the quest journal ("![]() ").
").
- • Place 1x Lockable Rope Drum (0/1)
Step 14
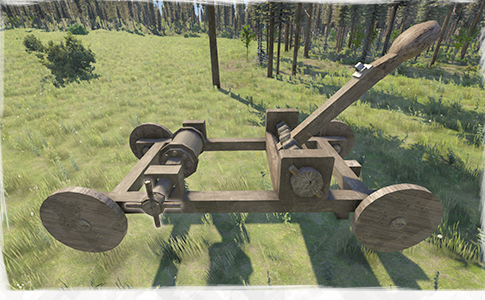
Place a Hand Crank Wheel on the outside of the Extended Catch Block.
See the example image in the quest journal ("![]() ").
").
- • Place 1x Hand Crank Wheel (0/1)
Step 15
You will need to attach the Lockable Rope Drum to the Rope Eye Plate on the throwing arm using a Basic Rope. Lock the rope drum and turn the hand crank to pull back the arm. Place something in the bucket and unlock the rope drum to fire the catapult. You only need to invent some munitions and you're ready to siege castles!
See the example image in the quest journal ("![]() ").
").
- • Obtain 1x Basic Ropes (0/1)
