Keen:Planet Modding/Voxel Materials: Difference between revisions
CptTwinkie (talk | contribs) |
CptTwinkie (talk | contribs) mNo edit summary |
||
| (30 intermediate revisions by the same user not shown) | |||
| Line 1: | Line 1: | ||
<noinclude>{{SEO|image_url=http://www.medievalengineerswiki.com/images/d/da/Voxels_6-3.jpg|description=In this guide you'll learn how to modify voxel and grass (foliage) textures and how to create voxel definitions.}} | |||
{{Keen:OCH}} | |||
{{Version <!-- Do not change the version until the entire page is up-to-date --> | |||
|release=0|major=6|minor=X|suppress=true}} | |||
[[Category:Keen_Modding_Guides]]</noinclude> | |||
==[[Keen:Planet Modding/Voxel Materials|Voxel Material Modding]]== | |||
Hello and welcome to the voxel materials modding guide. In this guide you'll learn how to modify voxel and grass (foliage) textures and how to create voxel definitions. | |||
[[File:Voxels 1-1.jpg|center|1200px]] | [[File:Voxels 1-1.jpg|center|1200px]] | ||
== | ===Creating the mod=== | ||
All of the vanilla voxels are defined in a single sbc file called VoxelMaterials.sbc. This file is located in the game's Content\Data folder. Find it and open it in MS Visual Studio or any advanced text editor. Notepad++ is a good alternative. Then search for the following line of code: <code><Id Type="VoxelMaterialDefinition" Subtype="Grass" /></code>. | |||
"Grass" is the name of the voxel definition we're going to use. This is exactly how it's called in the game and it is the green grass seen in forest fields. | |||
*Note: The screenshots in this guide use the "Woods_grass" Subtype. Woods_grass was used because it was the first large patch of voxel found. If you wish to modify Wood_grass instead, you only need to change the Subtype in your definition. The Subtype defines which material definition you want to modify. If you give it a name that is not used by one of the vanilla materials you will be creating a new material that won't exist on the planet by default. | |||
====Mod base folder==== | |||
Start by navigating to <code>%appdata%\MedievalEngineers\Mods</code> | |||
Create a new folder there and give it the name of your mod. In this guide, the mod is named "Orange Voxels". | |||
The Orange Voxels folder is the base folder for the mod. Mod folders behave as though they are the game's Content folder. When you place folders and files into the mod folder, it's as if you are placing them in the Content folder. This makes it possible to create mods by simply placing files into this folder that will "override" the vanilla files. This makes changing a vanilla texture or sound very easy. For the purposes of this guide, we'll be making new files and a new definition so you can see how that is done. The following sections will walk you through mirroring the folder structure for files you will be modifying. | |||
====Voxel textures==== | |||
{{Thumbnail|Voxels_Folders1.jpg|}} | |||
The vanilla voxel textures are located in <code>Content\Textures\Voxels\</code>. <br/> | |||
Inside you mod folder, create a Textures folder. <br/> | |||
Inside of the textures folder, create a Voxels folder. | |||
Copy the Grass voxel textures from the game's Voxels folder to your own Voxels folder. Here is the list of files: | |||
*Grass_add.dds | |||
*Grass_cm.dds | |||
*Grass_distance_cm.dds | |||
*Grass_distance_ng.dds | |||
*Grass_Far1_add.dds | |||
*Grass_Far1_cm.dds | |||
*Grass_Far1_ng.dds | |||
*Grass_ng.dds | |||
After you have copied the files to your mod folder you can rename them. Renaming them will prevent them from "overriding" the game's files. As stated above, we won't be "overriding" any files for this guide. Here is how we named ours: | |||
*GrassOrange_add.dds | |||
*GrassOrange_cm.dds | |||
*GrassOrange_distance_cm.dds | |||
*GrassOrange_distance_ng.dds | |||
*GrassOrange_Far1_add.dds | |||
*GrassOrange_Far1_cm.dds | |||
*GrassOrange_Far1_ng.dds | |||
*GrassOrange_ng.dds | |||
====Grass textures (Foliage)==== | |||
{{Thumbnail|Voxels_Folders2.jpg|}} | |||
The vanilla grass textures are located in <code>Content\Models\Environment\Grass\</code>. <br/> | |||
Inside you mod folder, create a Models folder. <br/> | |||
Inside of the Models folder, create an Environment folder. <br/> | |||
Inside of the Environment folder, create a Grass folder. | |||
Copy the Grass Grass textures (yep, I wrote it twice) from the game's Grass folder to your own Grass folder. We're only going to use three of them for this guide to keep things short. You'll get much more interesting grass by using more but these basic grasses will work for our guide. Here is the list of files: | |||
*Grass_01_cm.dds | |||
*Grass_01_ng.dds | |||
*Grass_02_cm.dds | |||
*Grass_02_ng.dds | |||
*Grass_03_cm.dds | |||
*Grass_03_ng.dds | |||
After you have copied the files to your mod folder you can rename them. Renaming them will prevent them from "overriding" the game's files. As stated above, we won't be "overriding" any files for this guide. Here is how we named ours: | |||
*GrassOrange_01_cm.dds | |||
*GrassOrange_01_ng.dds | |||
*GrassOrange_02_cm.dds | |||
*GrassOrange_02_ng.dds | |||
*GrassOrange_03_cm.dds | |||
*GrassOrange_03_ng.dds | |||
====Definition (sbc)==== | |||
{{Thumbnail|Voxels_Folders3.jpg|}} | |||
Definitions are found inside of <code>Content\Data\</code>.<br/> | |||
Inside you mod folder, create a Data folder. | |||
This folder does not work the same way as the other content folders. It does not matter how you organize your files here. The game will simply read every file and process every definition individually. That should make this the easiest folder to organize. | |||
< | You will need an sbc file to create your definition. Start by creating a text file (NewFile.txt) and rename it to something more appropriate like OrangeVoxels.sbc. | ||
====Voxel icon==== | |||
{{Thumbnail|Voxels_Folders4.jpg|}} | |||
The vanilla grass icon is located in <code>Content\GUI\Icons\Voxel\</code>. <br/> | |||
Inside you mod folder, create a GUI folder. <br/> | |||
Inside of the GUI folder, create an Icons folder.<br/> | |||
Inside of the Icons folder, create a Voxel folder. | |||
Copy the Grass icon from the game's Voxel folder to your own Voxel folder. There is only one icon for each voxel type. Here is the file: | |||
*Grass.png | |||
After you have copied the file to your mod folder you can rename it. Renaming it will prevent it from "overriding" the game's file. As stated above, we won't be "overriding" any files for this guide. Here is how we named ours: | |||
*OrangeGrass.png | |||
You may be wondering why it's not named GrassOrange.png. We are wondering the same thing. Hopefully you will not make mistakes like this when making your own mods. This just goes to show how easy it is to mess up the details. | |||
===Voxel material definitions=== | |||
Every voxel material is a <code>MyObjectBuilder_Dx11VoxelMaterialDefinition</code> Definition. Below is a quick annotated view of the "Grass" definition that defines how voxels look and behave: | |||
<syntaxhighlight lang="xml" line> | |||
<Definition xsi:type="MyObjectBuilder_Dx11VoxelMaterialDefinition"> | <Definition xsi:type="MyObjectBuilder_Dx11VoxelMaterialDefinition"> | ||
<Id | <Id Type="VoxelMaterialDefinition" Subtype="Grass" /><!-- GLOBAL NAME OF THE VOXEL MATERIAL --> | ||
<PhysicalMaterialName>Grass</PhysicalMaterialName><!-- NAME OF THE PHYSICAL MATERIAL REFERENCED FOR SOUNDS AND MINING --> | |||
< | |||
<Hardness>100</Hardness><!-- INFLUENCES HOW MUCH DURABILITY IS LOST WHEN MATERIAL IS MINED --> | <Hardness>100</Hardness><!-- INFLUENCES HOW MUCH DURABILITY IS LOST WHEN MATERIAL IS MINED --> | ||
<ColorKey Hex="# | <ColorKey Hex="#BCBB56"/><!-- THE COLOR OF THIS VOXEL. USED WHEN CALCULATING COLOR SHIFT --> | ||
<ColorMetalXZnY>Textures\Voxels\Grass_cm.dds</ColorMetalXZnY><!-- COLOR & METALNESS TEXTURE --> | <ColorMetalXZnY>Textures\Voxels\Grass_cm.dds</ColorMetalXZnY><!-- COLOR & METALNESS TEXTURE --> | ||
<ColorMetalY>Textures\Voxels\Grass_cm.dds</ColorMetalY> | <ColorMetalY>Textures\Voxels\Grass_cm.dds</ColorMetalY><!-- OPTIONAL Y TEXTURES ARE USED AS OVERRIDES ON THE HORIZONTAL FACE OF VOXELS. THIS IS THE FACE YOU NORMALLY SEE EXCEPT FOR STEEP SLOPES AND HOLES --> | ||
<NormalGlossXZnY>Textures\Voxels\Grass_ng.dds</NormalGlossXZnY><!-- | <NormalGlossXZnY>Textures\Voxels\Grass_ng.dds</NormalGlossXZnY><!-- NORMAL & GLOSS TEXTURE GOES HERE --> | ||
<NormalGlossY>Textures\Voxels\Grass_ng.dds</NormalGlossY> | <NormalGlossY>Textures\Voxels\Grass_ng.dds</NormalGlossY> | ||
< | <ExtXZnY>Textures\Voxels\Grass_add.dds</ExtXZnY><!-- EXTENDED (ADD) TEXTURE GOES HERE --> | ||
<ExtY>Textures\Voxels\GrassAndHayY_add.dds</ExtY> | |||
<SpecularPower>24</SpecularPower><!-- --> | |||
< | <SpecularShininess>0.364</SpecularShininess><!-- REFLECTIVITY OF THE GLOSS --> | ||
< | <Icon>Textures\GUI\Icons\Voxel\Grass.png</Icon><!-- THE ICON DISPLAYED BY VOXEL HAND TOOLS --> | ||
< | |||
<!-- FAR1 TEXTURE --> | |||
< | <ColorMetalXZnYFar1>Textures\Voxels\Grass_Far1_cm.dds</ColorMetalXZnYFar1> | ||
< | <ColorMetalYFar1>Textures\Voxels\Grass_Far1_cm.dds</ColorMetalYFar1> | ||
< | <NormalGlossXZnYFar1>Textures\Voxels\Grass_Far1_ng.dds</NormalGlossXZnYFar1> | ||
<NormalGlossYFar1>Textures\Voxels\Grass_Far1_ng.dds</NormalGlossYFar1> | |||
< | |||
<ExtXZnYFar1>Textures\Voxels\Grass_Far1_add.dds</ExtXZnYFar1> | <ExtXZnYFar1>Textures\Voxels\Grass_Far1_add.dds</ExtXZnYFar1> | ||
<!-- FAR2 TEXTURE --> | |||
<ColorMetalXZnYFar2>Textures\Voxels\Grass_Far1_cm.dds</ColorMetalXZnYFar2> | |||
<ColorMetalYFar2>Textures\Voxels\Grass_Far1_cm.dds</ColorMetalYFar2> | |||
<NormalGlossXZnYFar2>Textures\Voxels\Grass_Far1_ng.dds</NormalGlossXZnYFar2> | |||
<NormalGlossYFar2>Textures\Voxels\Grass_Far1_ng.dds</NormalGlossYFar2> | |||
<ExtXZnYFar2>Textures\Voxels\Grass_Far1_add.dds</ExtXZnYFar2> | <ExtXZnYFar2>Textures\Voxels\Grass_Far1_add.dds</ExtXZnYFar2> | ||
<!-- SCALING AND DISTANCE --> | |||
<InitialScale>5</InitialScale><!-- DEFINES HOW BIG THE TEXTURE IS --> | |||
<ScaleMultiplier>5</ScaleMultiplier><!-- DEFINES HOW MUCH THE TEXTURE SCALES AT DISTANCE --> | |||
<InitialDistance>5</InitialDistance><!-- RANGE WHERE SCALING STARTS --> | |||
<DistanceMultiplier>5.2</DistanceMultiplier><!-- MULTIPLIES DISTANCE RANGE --> | |||
<!-- FAR SCALING AND DISTANCE --> | |||
<Far1Distance>20</Far1Distance><!-- THE DISTANCE (IN METERS) AT WHICH "FAR1" TEXTURE WILL SHOW UP --> | |||
<Far2Distance>120</Far2Distance><!-- THE DISTANCE (IN METERS) AT WHICH "FAR2" TEXTURE WILL SHOW UP --> | |||
<Far1Scale>100</Far1Scale><!-- DEFINES HOW BIG THE "FAR1" TEXTURE IS --> | |||
<Far2Scale>300</Far2Scale><!-- DEFINES HOW BIG THE "FAR2" TEXTURE IS --> | |||
<!-- | <Foliage Density="30" Type="Grass"><!-- HIGHER VALUES MEAN MORE GRASS --> | ||
<Size x=".55" y=".55"/><!-- THE SCALE OF THE GRASS (NOT THE ABSOLUTE SIZE). THIS SHOULD GENERALLY BE CHANGED UNIFORMLY --> | |||
<SizeVariation>.6</SizeVariation><!-- (INTENDED) RANGE OF RANDOM SIZE VARIATION / (ACTUAL) SIZE MULTIPLIER --> | |||
<!-- GRASS TEXTURES GO HERE. YOU CAN ADD AS MANY DIFFERENT GRASS TEXTURES AS YOU LIKE. THE MORE YOU ADD, THE MORE DIVERSE AND UNIQUE YOUR GRASS WILL BE. --> | |||
<!-- COLOR & ALPHA TEXTURES ARE ADDED TO Color ATTRIBUTES. NORMAL & GLOSS TEXTURES ARE ADDED TO Normal ATTRIBUTES. THE Frequency ATTRIBUTE CONTROLS HOW OFTEN EACH TEXTURE PAIR IS USED. --> | |||
<Color>Textures\Models\Environment\Grass\ | <Variation Color="Textures\Models\Environment\Grass\Grass_01_cm.dds" Normal="Textures\Models\Environment\Grass\Grass_01_ng.dds" Frequency="1"/> | ||
<Color | <Variation Color="Textures\Models\Environment\Grass\Grass_01_cm.dds" Normal="Textures\Models\Environment\Grass\Grass_01_ng.dds" Frequency="1"/> | ||
<Color>Textures\Models\Environment\Grass\ | <Variation Color="Textures\Models\Environment\Grass\Grass_03_cm.dds" Normal="Textures\Models\Environment\Grass\Grass_03_ng.dds" Frequency="1"/> | ||
<Color>Textures\Models\Environment\Grass\ | <Variation Color="Textures\Models\Environment\Grass\Grass_04_cm.dds" Normal="Textures\Models\Environment\Grass\Grass_04_ng.dds" Frequency="0.3"/> | ||
<Color | <Variation Color="Textures\Models\Environment\Grass\Grass_05_cm.dds" Normal="Textures\Models\Environment\Grass\Grass_05_ng.dds" Frequency="1"/> | ||
... | <Variation Color="Textures\Models\Environment\Grass\Grass_06_cm.dds" Normal="Textures\Models\Environment\Grass\Grass_06_ng.dds" Frequency="2"/> | ||
</ | <Variation Color="Textures\Models\Environment\Grass\Grass_07_cm.dds" Normal="Textures\Models\Environment\Grass\Grass_07_ng.dds" Frequency="1"/> | ||
<Variation Color="Textures\Models\Environment\Grass\Grass_08_cm.dds" Normal="Textures\Models\Environment\Grass\Grass_08_ng.dds" Frequency="1"/> | |||
<Variation Color="Textures\Models\Environment\Grass\Grass_09_cm.dds" Normal="Textures\Models\Environment\Grass\Grass_09_ng.dds" Frequency="0.5"/> | |||
<Variation Color="Textures\Models\Environment\Grass\Grass_10_cm.dds" Normal="Textures\Models\Environment\Grass\Grass_10_ng.dds" Frequency="1"/> | |||
<Variation Color="Textures\Models\Environment\Grass\Grass_11_cm.dds" Normal="Textures\Models\Environment\Grass\Grass_11_ng.dds" Frequency="0.3"/> | |||
<Variation Color="Textures\Models\Environment\Grass\Grass_12_cm.dds" Normal="Textures\Models\Environment\Grass\Grass_12_ng.dds" Frequency="2"/> | |||
<Variation Color="Textures\Models\Environment\Grass\Grass_13_cm.dds" Normal="Textures\Models\Environment\Grass\Grass_13_ng.dds" Frequency="0.2"/> | |||
</Foliage> | |||
<!-- THE MATERIAL THAT WILL APPEAR IF THE VOXEL IS DAMAGED. THIS DOESN'T AFFECT MINING. --> | |||
<DamagedMaterial>Soil</DamagedMaterial> | <DamagedMaterial>Soil</DamagedMaterial> | ||
</Definition> | </Definition> | ||
</ | </syntaxhighlight> | ||
What you should know is that the grass you see in a screenshot consists of the voxel that makes up the ground and the grass that grows from the voxel. | |||
==Understanding | |||
===Understanding how voxel textures are made=== | |||
< | The following lines of code define the textures for the base voxel. These textures define how the ground will look. | ||
<syntaxhighlight lang="xml" line> | |||
<ColorMetalXZnY>Textures\Voxels\Grass_cm.dds</ColorMetalXZnY> | <ColorMetalXZnY>Textures\Voxels\Grass_cm.dds</ColorMetalXZnY> | ||
<ColorMetalY>Textures\Voxels\Grass_cm.dds</ColorMetalY> | |||
<NormalGlossXZnY>Textures\Voxels\Grass_ng.dds</NormalGlossXZnY> | <NormalGlossXZnY>Textures\Voxels\Grass_ng.dds</NormalGlossXZnY> | ||
<NormalGlossY>Textures\Voxels\Grass_ng.dds</NormalGlossY> | |||
<ExtXZnY>Textures\Voxels\Grass_add.dds</ExtXZnY> | <ExtXZnY>Textures\Voxels\Grass_add.dds</ExtXZnY> | ||
</ | <ExtY>Textures\Voxels\GrassAndHayY_add.dds</ExtY> | ||
</syntaxhighlight> | |||
You may have noticed that for each texture there are two lines, a XZnY line and a Y line. Only the XZnY lines are strictly necessary to make the voxel work. The Y lines could be left out completely. The Y lines work by overriding the texture on the Y face of the voxels. This face is usually the one that is horizontal and is the one seen most often in the game. Overriding the Y face gives you the ability to use different textures for the other faces. This is done most often in Medieval Engineers for the mountains. That way the steep slopes can have a different texture than the mountain tops. This can also be done with other kinds of voxels, like Grass, but the results are not perfect. See the screenshot in the next section for a demonstration. | |||
If you skip the Y lines for now that still gives you three textures for one voxel. WHY? Medieval Engineers is a DirectX 11 game that uses [https://en.wikipedia.org/wiki/Physically_based_rendering Physically Based Rendering (PBR)]. This means that material textures contain information for color, metalness, normal mapping, gloss, ambient occlusion, emissivity, and roughness (dirt). The VRage engine also supports color masking which is outside of the standard PBR texturing. So you have 8 channels to work with and three files. Here's how the texture channels are packed for voxel materials. | |||
<pre> | |||
//////////////////////////////////// | |||
// Voxel Channels | |||
//////////////////////////////////// | |||
// CM | |||
RGB: Color | |||
A: Metal (0=Black) | |||
// NG | |||
RGB: Normal | |||
A: Gloss (0=Black) | |||
// ADD | |||
R: Ambient Occlusion (0=White) | |||
G: Emissive NOT USED (0=Black) | |||
B: Roughness (dirt) NOT USED (0=?) | |||
A: Color Shift (0=Black) | |||
</pre> | |||
That means the cm texture <code><ColorMetalXZnY>Textures\Voxels\Grass_cm.dds</ColorMetalXZnY></code> contains color information in the Red, Green, and Blue channels, and Metalness information in the Alpha channel. Metalness defines the [https://en.wikipedia.org/wiki/Metallic_color metallicity] of a material, white being full metal and black being non-metal. | |||
[[File:Voxels 3-2.jpg|center]] | [[File:Voxels 3-2.jpg|center]] | ||
The ng texture <code><NormalGlossXZnY>Textures\Voxels\Grass_ng.dds</NormalGlossXZnY></code> contains normal mapping in the Red, Green, and Blue channels, and Gloss information in the Alpha channel. Gloss defines the [https://en.wikipedia.org/wiki/Gloss_(optics) shininess] of the material, white being very glossy/shiney and black being completely dull. [https://en.wikipedia.org/wiki/Normal_mapping Normal mapping], if you are not aware, is a way of creating 3D lighting on a 2D surface. Normal mapping is a more modern version of bump mapping. | |||
[[File:Voxels 3-3.jpg|center]] | [[File:Voxels 3-3.jpg|center]] | ||
The add texture <code><ExtXZnY>Textures\Voxels\Grass_add.dds</ExtXZnY></code> contains ambient occlusion mapping in the Red channel and color shift mapping in the Alpha channel. [https://en.wikipedia.org/wiki/Ambient_occlusion Ambient occlusion] mapping is used by shaders to create more realistic lighting, where white creates no occlusion and black creates a lot of occlusion. The Green and Blue channels are not used for voxel materials at this time. | |||
[[File:Voxels 3-4.jpg|center]] | [[File:Voxels 3-4.jpg|center]] | ||
===Changing the voxel color=== | |||
{{TextBox|Important note: | |||
All textures must be saved in DDS format with BC7 compression. | |||
[[ | We recommend using the [https://software.intel.com/en-us/articles/intel-texture-works-plugin Intel® Texture Works Plugin for Photoshop] or [https://github.com/Microsoft/DirectXTex/wiki/Texconv Microsoft/DirectXTex] | ||
TextConv can be run from the command line. There is also a GUI project at https://github.com/Mirzipan/TexConvGUI}} | |||
<center> | |||
Use the following settings with texture works | |||
Texture Type: Color + Alpha | |||
Compression: BC7 8bpp fine (sRGB, DX11+) for cm and add / BC7 8bpp fine (Linear, DX11+) for ng | |||
Mip Maps: Auto Generate</center> | |||
[[File:Voxels 3-7.jpg|center]] | [[File:Voxels 3-7.jpg|center]] | ||
| Line 139: | Line 277: | ||
If you load the game now to see what happened to the grass, you will see that | Open the first “Grass_cm.dds” texture in Photoshop and add a Hue/Saturation adjustment layer on top. Use the following settings to make the color a warm autumn orange. | ||
[[File:Voxels 3-5.jpg|center]] | |||
Now re-save this file using BC7 sRGB compression. | |||
Change your OrangeVoxels.sbc file’s definitions to use this file instead of the default one. Now is a good time to change all of the base textures. | |||
<syntaxhighlight lang="xml" line> | |||
<ColorMetalXZnY>Textures\Voxels\GrassOrange_cm.dds</ColorMetalXZnY> | |||
<ColorMetalY>Textures\Voxels\GrassOrange_cm.dds</ColorMetalY> | |||
<NormalGlossXZnY>Textures\Voxels\GrassOrange_ng.dds</NormalGlossXZnY> | |||
<NormalGlossY>Textures\Voxels\GrassOrange_ng.dds</NormalGlossY> | |||
<ExtXZnY>Textures\Voxels\GrassOrange_add.dds</ExtXZnY> | |||
<ExtY>Textures\Voxels\GrassOrange_add.dds</ExtY> | |||
</syntaxhighlight> | |||
If you load the game now to see what happened to the grass, you will see that you've changed the color of the Grass Voxel Material (surface) only, while the grass which grows on it remains green. | |||
[[File:Voxels 3-8.jpg|center|1200px]] | [[File:Voxels 3-8.jpg|center|1200px]] | ||
You will need to also change the grass but first there are some details to work out with the voxels. | |||
# Numbered list item | |||
===Mod Compatibility=== | |||
You may have noticed a message box with the following warning. | |||
[[File: | [[File:Voxels_3-85.jpg|600px]] | ||
The solution to this is to create a <code>metadata.mod</code> file in your mod folder. See the [[Keen:Mod Metadata|Mod Metadata]] guide for details. | |||
===Voxel scaling=== | |||
If you look at the voxels without the grass enabled you may notice a couple of things. The first thing is the voxels further away are still green instead of orange. These are the far textures and you can set those in the next section. If you look closely at the size of the textures on the voxels you may be able to see that they are not all the same size. In fact the voxels scale based on distance. While this isn't so critical with grass it will affect other voxels more. Image a brick voxel where the bricks all appear to be the same size no matter how far away they are. The solution to this is voxel scaling. | |||
You can experiment with the voxel scaling by opening the developer debug screen ({{Key|shift}}+{{Key|f12}}) and selecting Voxel Materials at the bottom. Hold {{Key|alt}} to interact with the sliders on the debug panel. You can press {{Key|shift}}+{{Key|f12}} again to close the main debug screen while keeping the voxel materials screen open. Press {{Key|escape}} to close the screen. All of the sliders in this screen relate to settings in the voxel material definition. They can all be used in the definition but some settings are ignored or not useful in Medieval Engineers. Far3 is an example of this. It replaces the voxel texture with a solid color. This is useful when viewing voxels from many kilometers away, such as from space. Since Medieval Engineers isn't meant to be played from space, this extra setting isn't helpful. | |||
[[File:1200px-Voxels_3-10.jpg|center|1200px]] | |||
===Far textures=== | |||
Now that you're acquainted with cm, ng, and add files, you shouldn't have much trouble setting up Far1 and Far2 textures. The reason these textures are used is twofold, to reduce the small details on textures that are not close to the player and to increase the large details on those same textures. Again, the place where this is most obvious is the mountains. They have big beautifully detailed textures on the sides that look great at a distance. Since these are only textures they would look incredibly bad up close where there is no geometry to support the rugged looking far textures. Up close, the base textures load and they match the voxel geometry much closer. Since Medieval Engineers is meant to be played from the ground (not flying around) the differences between base textures and far textures can be quite noticeable and still not break immersion in the game. | |||
Here are the cm files for Grass. The base texture, Far1 texture, and Far2 (distant) texture. | |||
[[File:Voxels 4-1.jpg|center|1200px]] | |||
These textures form concentric circles around the player. To illustrate this point, the image below was made with a blue texture in Far1 and a red texture in Far2. Take note of how little detail can be seen in the bland Far2 texture. In contrast, the mountains in the background have very large scale details in their far textures. | |||
[[File:Voxels 3-9.jpg|center|1200px]] | |||
<center><small>Notice also that the scaling is wrong on the Far1 (blue) texture.</small></center> | |||
Open the Far1 and distant textures in Photoshop and add the same Hue/Saturation adjustment layer on top. You may want to adjust it to better match the coloring of the base texture. Save them the same way as the others and then add them to your sbc file. | |||
<syntaxhighlight lang="xml" line> | |||
<ColorMetalXZnYFar1>Textures\Voxels\GrassOrange_Far1_cm.dds</ColorMetalXZnYFar1> | |||
<NormalGlossXZnYFar1>Textures\Voxels\GrassOrange_Far1_ng.dds</NormalGlossXZnYFar1> | |||
<ExtXZnYFar1>Textures\Voxels\GrassOrange_Far1_add.dds</ExtXZnYFar1> | |||
<ColorMetalXZnYFar2>Textures\Voxels\GrassOrange_distance_cm.dds</ColorMetalXZnYFar2> | |||
<NormalGlossXZnYFar2>Textures\Voxels\GrassOrange_distance_ng.dds</NormalGlossXZnYFar2> | |||
<ExtXZnYFar2>Textures\Voxels\GrassOrange_Far1_add.dds</ExtXZnYFar2> | |||
</syntaxhighlight> | |||
You may have noticed that the same add file was used for both Far1 and Far2. Normally a small dummy file is substituted in far textures to save memory since ambient occlusion doesn't really play much of a role at such a distance. However, Medieval Engineers also has color shift information in the add texture which is necessary if players are to be able to find iron ore. Using the same add file for both just saves from adding an extra texture for each voxel. | |||
You may want to load the game and use the Voxel Materials screen again. This time to find appropriate far distance and scale settings. These are a little less complex than the base scaling settings. The distance is in meters. | |||
<syntaxhighlight lang="xml" line> | |||
<Far1Distance>20</Far1Distance> | |||
<Far2Distance>120</Far2Distance> | |||
<Far1Scale>100</Far1Scale> | |||
<Far2Scale>300</Far2Scale> | |||
</sousyntaxhighlightrce> | |||
The screenshot below has all of the orange voxel texture loaded with reasonable distances and scaling. | |||
[[File:Voxels 4-6.jpg|center|1200px]] | |||
===Y texture overrides=== | |||
You may still be wondering about those Y texture overrides discussed with the base textures. Below is an example of overriding a purple base texture with an orange Y override. | |||
[[File:1200px-Voxels_4-2.jpg|center|1200px]] | |||
As you can see the purple base texture blends in where the edge of the voxel becomes steep. However, on the other side of the hole you'll notice that the orange is still showing. This is because voxels are not always perfectly aligned with the surface of the planet. This is because voxels are large, clustered, and cubic. They do not map well to the curved surface of the planet. They are stretched and bent at the surface to make things smooth. These means that there will be some inconsistencies in texturing. You'll want to be aware of this behavior when using Y overrides. It's best to keep your override textures and base textures similar so that they blend smoothly. Bigger differences can be made in the far textures, although they have almost no blending at all. This can be seen quite clearly on the edges of distant snow where it does not blend with the surrounding voxels. Instead it has jagged square edges. | |||
===Understanding how grass textures are made=== | |||
The vanilla grass has 13 texture pairs to create a varied and interesting landscape. To simplify this guide, only three will be modified and used for the orange voxels. You can add more if you desire. | |||
Open the grass cm textures in Photoshop. You'll notice these textures look extremely sloppy and there is information in the metalness channel. Well the trick is that these textures don't use metalness. Here's how the texture channels are packed for grass materials. | |||
<pre> | |||
< | //////////////////////////////////// | ||
// Grass Channels | |||
//////////////////////////////////// | |||
// CM | |||
RGB: Color | |||
A: Transparency | |||
// NG | |||
RGB: Normal | |||
A: Gloss | |||
</pre> | |||
</ | |||
There is no metalness channel, only a more 2D style Alpha channel transparency. It is necessary for the grass to have this alpha masking since it is not a 3D model. | |||
Grasses are actually planes with alpha masks. This allows them to render quickly and be animated en masse. | |||
[[File:Voxels 5-2.jpg| | <center> | ||
[[File:Voxels 5-2.jpg|512px|frameless]] [[File:Voxels 5-5.jpg|512px|frameless]] | |||
[[File:Voxels 5-3.jpg| | [[File:Voxels 5-3.jpg|512px|frameless]] [[File:Voxels 5-6.jpg|512px|frameless]] | ||
[[File:Voxels 5-4.jpg| | [[File:Voxels 5-4.jpg|512px|frameless]] [[File:Voxels 5-7.jpg|512px|frameless]] | ||
</center> | |||
===Changing the grass color=== | |||
Apply the Hue/Saturation filter to the cm files. | |||
[[File:Voxels | [[File:Voxels 6-1.jpg|center]] | ||
After you have saved the changes with appropriate compression, add the orange grasses to your sbc file. | |||
<syntaxhighlight lang="xml" line> | |||
<Foliage Density="30" Type="Grass"> | |||
<Size x=".55" y=".55"/> | |||
<SizeVariation>.6</SizeVariation> | |||
<Variation Color="Textures\Models\Environment\Grass\GrassOrange_01_cm.dds" Normal="Textures\Models\Environment\Grass\GrassOrange_01_ng.dds" Frequency="1"/> | |||
<Variation Color="Textures\Models\Environment\Grass\GrassOrange_01_cm.dds" Normal="Textures\Models\Environment\Grass\GrassOrange_01_ng.dds" Frequency="1"/> | |||
<Variation Color="Textures\Models\Environment\Grass\GrassOrange_03_cm.dds" Normal="Textures\Models\Environment\Grass\GrassOrange_03_ng.dds" Frequency="1"/> | |||
</Foliage> | |||
</syntaxhighlight> | |||
<center><small>Note: The <code><SizeVariation></code> tag doesn't seem to be working correctly. Instead of allowing for variations it is only multiplying the size.</small></center> | |||
Reload the world and you should have some really rusty orange grass. It's like if grass turned colors in the autumn like the tree leaves! | |||
[[File:Voxels 6-3.jpg|center|1200px]] | |||
== | ===Icon and color masking=== | ||
There are a few small details to take care of. The first is the icon. It is a standard png file so open it in Photoshop, apply the Hue/Saturation, merge the adjustment layer down, and save. | |||
Make sure to add it to the sbc file <code><Icon>Textures\GUI\Icons\Voxel\OrangeGrass.png</Icon></code>. | |||
[[File:Icon.jpg|center]] | |||
< | You may have noticed the <code><ColorKey Hex="#65210a"/></code> tag in the definition. You may have also been wondering about he color shift map in the add textures. Well here is how they work in Medieval Engineers. | ||
The ColorKey is meant to represent the voxel's average color. This value is a starting point for color shifting. In the vanilla game there is only one color shift and that is from iron ore which turns the voxels red. In order to do that it must calculate how far to shift the colors. It does that by taking the difference of the the red color and the voxel's ColorKey value. The remainder is the amount the color is shifted. | |||
The color shift map is what defines which parts of the voxel get shifted. If the map was white then the entire voxel would get shifted completely and it would just be very red. The color shift map allows you to specify which areas get shifted and how much that shift is applied. In the screenshot below you'll notice some of the grass remains red while some of it becomes bright orange. This is partially due to the original colors but also due to the color shift map. | |||
[[File:Voxels_7-1.jpg|center|1200px]] | |||
[[File: | |||
[[ | <noinclude>View the full [[Keen:Planet Modding - Full Guide|Planet Modding Guide]]</noinclude> | ||
Latest revision as of 20:27, 18 July 2022
 OFFICIAL CONTENT OFFICIAL CONTENT |
| Version: | 0.6 |
Voxel Material Modding
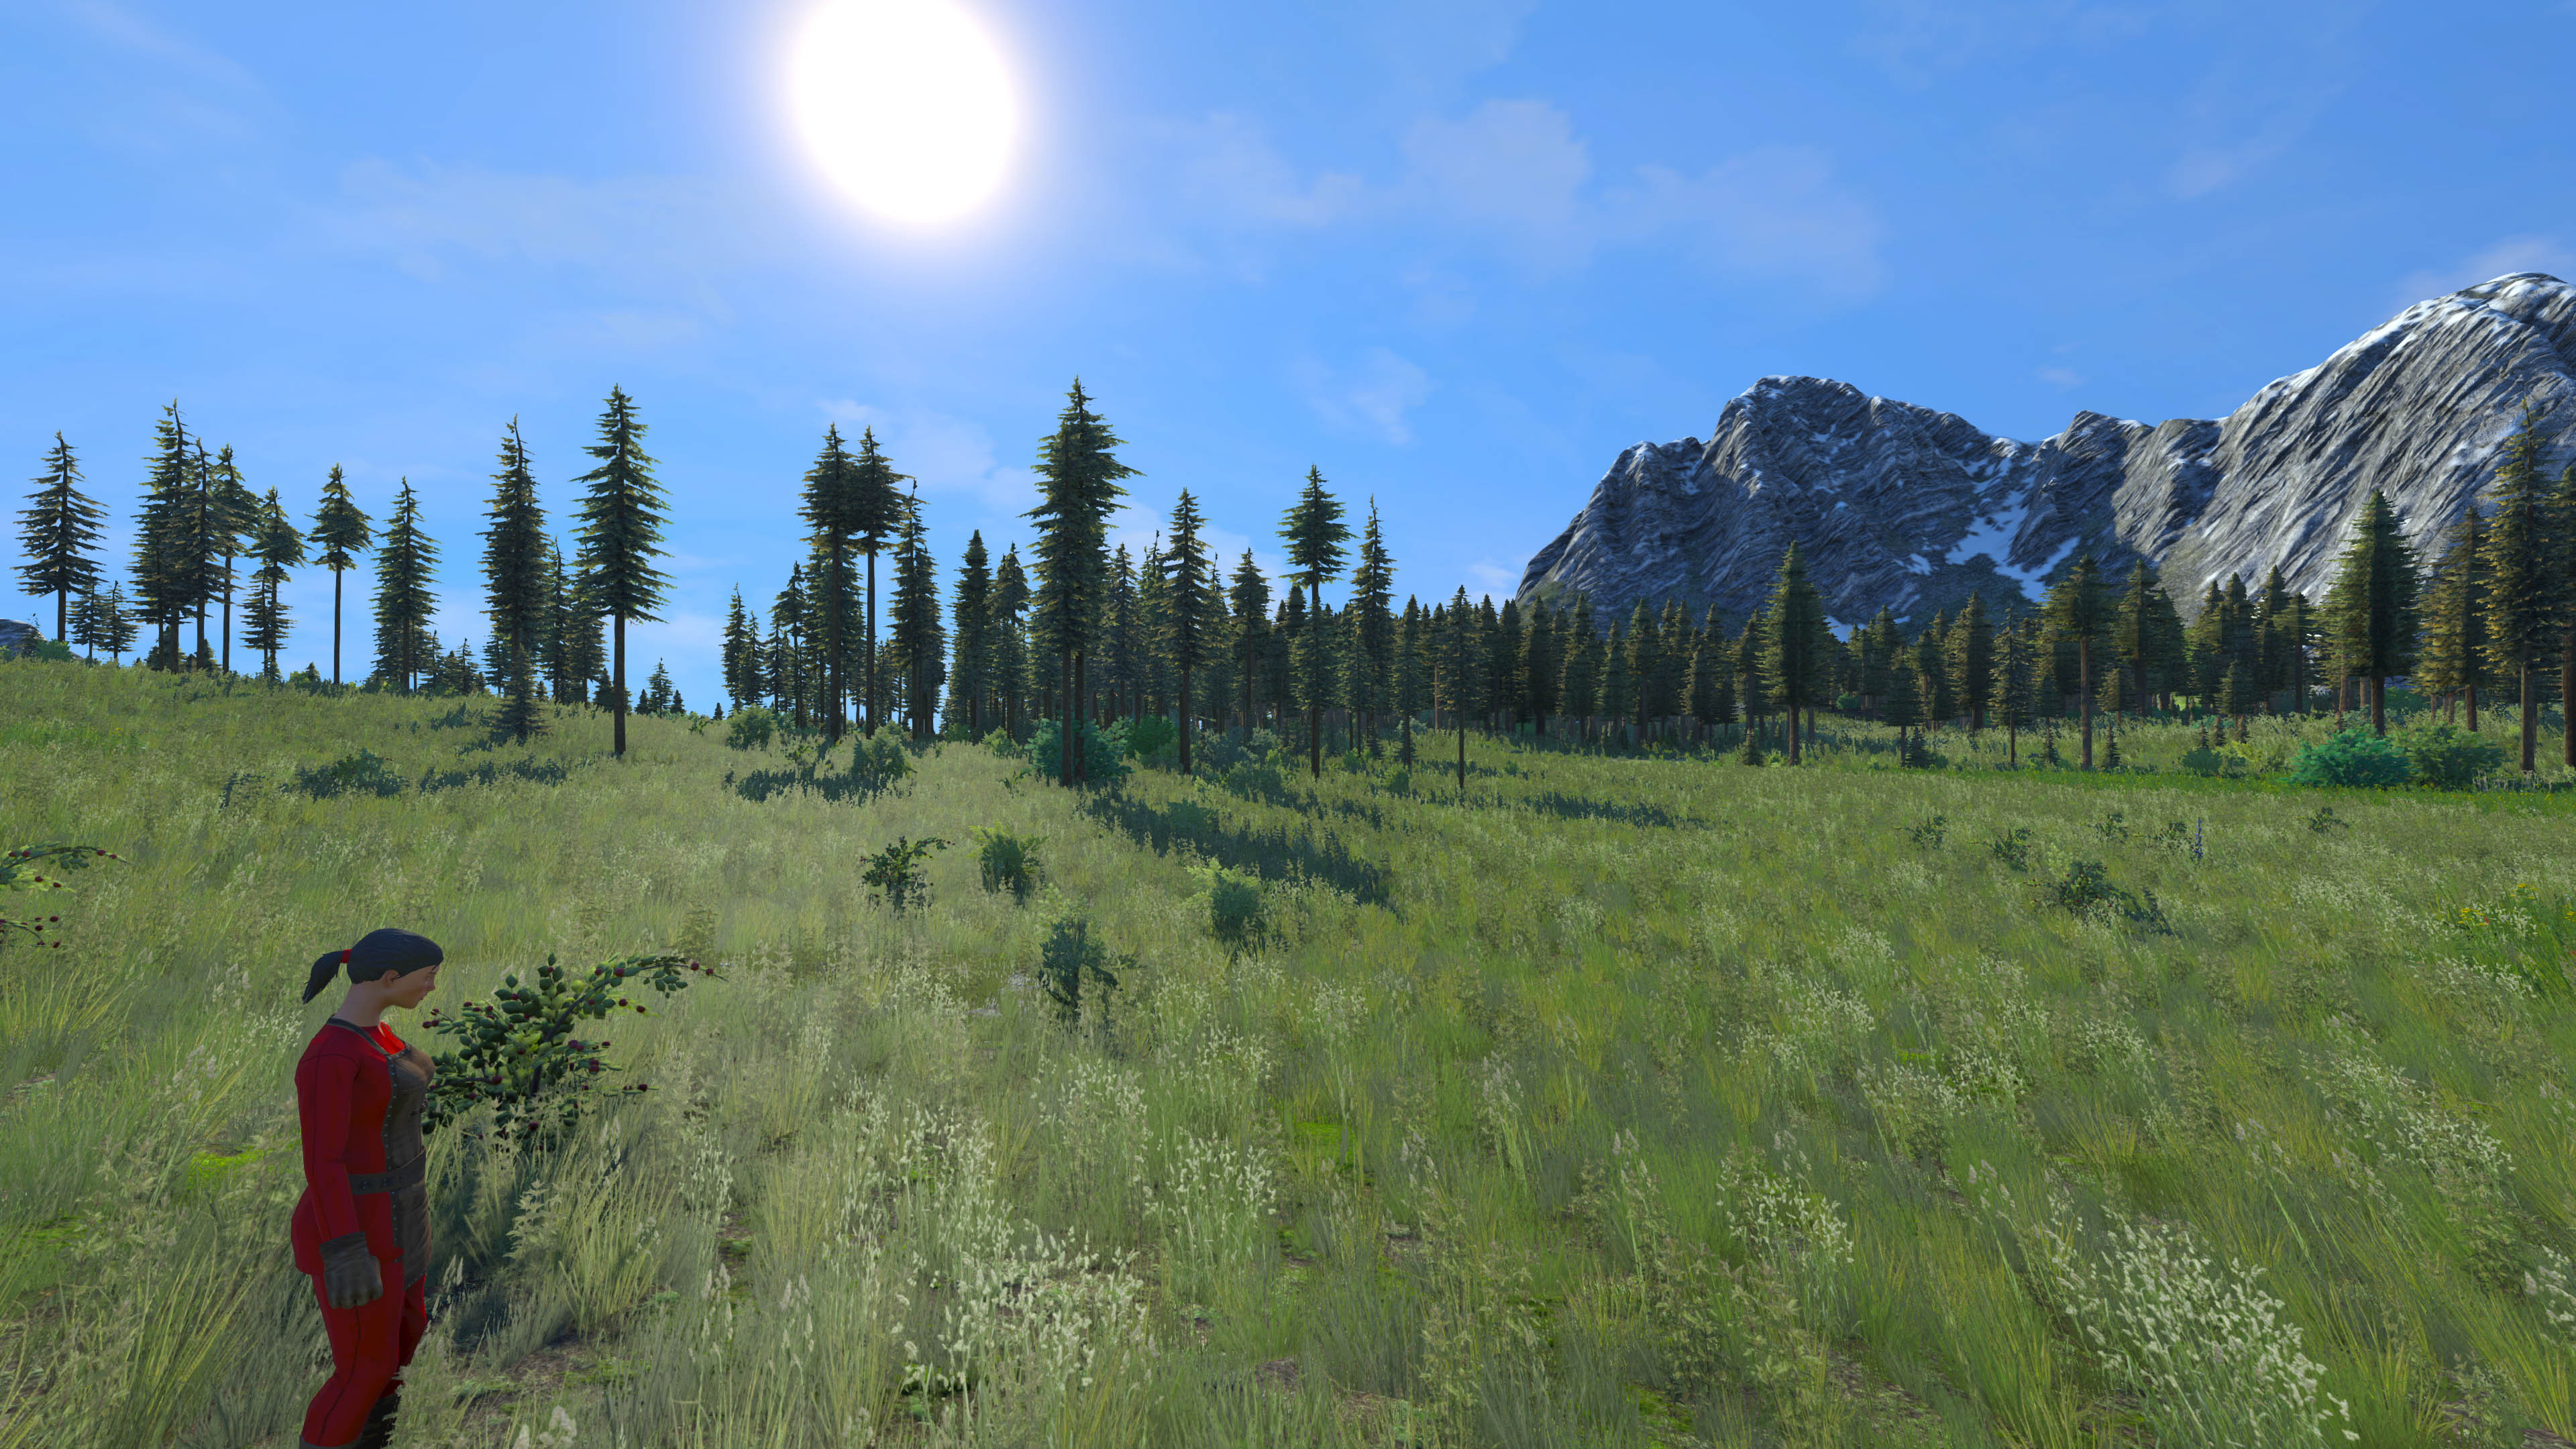
Hello and welcome to the voxel materials modding guide. In this guide you'll learn how to modify voxel and grass (foliage) textures and how to create voxel definitions.
Creating the mod
All of the vanilla voxels are defined in a single sbc file called VoxelMaterials.sbc. This file is located in the game's Content\Data folder. Find it and open it in MS Visual Studio or any advanced text editor. Notepad++ is a good alternative. Then search for the following line of code: <Id Type="VoxelMaterialDefinition" Subtype="Grass" />.
"Grass" is the name of the voxel definition we're going to use. This is exactly how it's called in the game and it is the green grass seen in forest fields.
- Note: The screenshots in this guide use the "Woods_grass" Subtype. Woods_grass was used because it was the first large patch of voxel found. If you wish to modify Wood_grass instead, you only need to change the Subtype in your definition. The Subtype defines which material definition you want to modify. If you give it a name that is not used by one of the vanilla materials you will be creating a new material that won't exist on the planet by default.
Mod base folder
Start by navigating to %appdata%\MedievalEngineers\Mods
Create a new folder there and give it the name of your mod. In this guide, the mod is named "Orange Voxels".
The Orange Voxels folder is the base folder for the mod. Mod folders behave as though they are the game's Content folder. When you place folders and files into the mod folder, it's as if you are placing them in the Content folder. This makes it possible to create mods by simply placing files into this folder that will "override" the vanilla files. This makes changing a vanilla texture or sound very easy. For the purposes of this guide, we'll be making new files and a new definition so you can see how that is done. The following sections will walk you through mirroring the folder structure for files you will be modifying.
Voxel textures
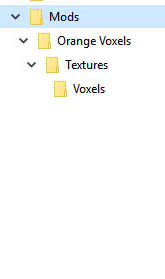
The vanilla voxel textures are located in Content\Textures\Voxels\.
Inside you mod folder, create a Textures folder.
Inside of the textures folder, create a Voxels folder.
Copy the Grass voxel textures from the game's Voxels folder to your own Voxels folder. Here is the list of files:
- Grass_add.dds
- Grass_cm.dds
- Grass_distance_cm.dds
- Grass_distance_ng.dds
- Grass_Far1_add.dds
- Grass_Far1_cm.dds
- Grass_Far1_ng.dds
- Grass_ng.dds
After you have copied the files to your mod folder you can rename them. Renaming them will prevent them from "overriding" the game's files. As stated above, we won't be "overriding" any files for this guide. Here is how we named ours:
- GrassOrange_add.dds
- GrassOrange_cm.dds
- GrassOrange_distance_cm.dds
- GrassOrange_distance_ng.dds
- GrassOrange_Far1_add.dds
- GrassOrange_Far1_cm.dds
- GrassOrange_Far1_ng.dds
- GrassOrange_ng.dds
Grass textures (Foliage)
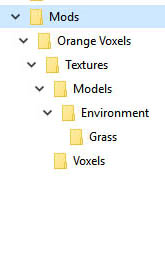
The vanilla grass textures are located in Content\Models\Environment\Grass\.
Inside you mod folder, create a Models folder.
Inside of the Models folder, create an Environment folder.
Inside of the Environment folder, create a Grass folder.
Copy the Grass Grass textures (yep, I wrote it twice) from the game's Grass folder to your own Grass folder. We're only going to use three of them for this guide to keep things short. You'll get much more interesting grass by using more but these basic grasses will work for our guide. Here is the list of files:
- Grass_01_cm.dds
- Grass_01_ng.dds
- Grass_02_cm.dds
- Grass_02_ng.dds
- Grass_03_cm.dds
- Grass_03_ng.dds
After you have copied the files to your mod folder you can rename them. Renaming them will prevent them from "overriding" the game's files. As stated above, we won't be "overriding" any files for this guide. Here is how we named ours:
- GrassOrange_01_cm.dds
- GrassOrange_01_ng.dds
- GrassOrange_02_cm.dds
- GrassOrange_02_ng.dds
- GrassOrange_03_cm.dds
- GrassOrange_03_ng.dds
Definition (sbc)
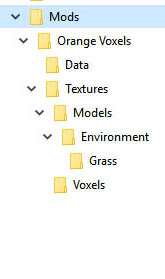
Definitions are found inside of Content\Data\.
Inside you mod folder, create a Data folder.
This folder does not work the same way as the other content folders. It does not matter how you organize your files here. The game will simply read every file and process every definition individually. That should make this the easiest folder to organize.
You will need an sbc file to create your definition. Start by creating a text file (NewFile.txt) and rename it to something more appropriate like OrangeVoxels.sbc.
Voxel icon
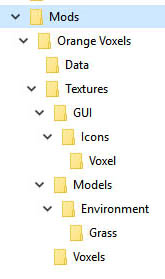
The vanilla grass icon is located in Content\GUI\Icons\Voxel\.
Inside you mod folder, create a GUI folder.
Inside of the GUI folder, create an Icons folder.
Inside of the Icons folder, create a Voxel folder.
Copy the Grass icon from the game's Voxel folder to your own Voxel folder. There is only one icon for each voxel type. Here is the file:
- Grass.png
After you have copied the file to your mod folder you can rename it. Renaming it will prevent it from "overriding" the game's file. As stated above, we won't be "overriding" any files for this guide. Here is how we named ours:
- OrangeGrass.png
You may be wondering why it's not named GrassOrange.png. We are wondering the same thing. Hopefully you will not make mistakes like this when making your own mods. This just goes to show how easy it is to mess up the details.
Voxel material definitions
Every voxel material is a MyObjectBuilder_Dx11VoxelMaterialDefinition Definition. Below is a quick annotated view of the "Grass" definition that defines how voxels look and behave:
  <Definition xsi:type="MyObjectBuilder_Dx11VoxelMaterialDefinition">
    <Id Type="VoxelMaterialDefinition" Subtype="Grass" /><!-- GLOBAL NAME OF THE VOXEL MATERIAL -->
    <PhysicalMaterialName>Grass</PhysicalMaterialName><!-- NAME OF THE PHYSICAL MATERIAL REFERENCED FOR SOUNDS AND MINING -->
    <Hardness>100</Hardness><!-- INFLUENCES HOW MUCH DURABILITY IS LOST WHEN MATERIAL IS MINED -->
    <ColorKey Hex="#BCBB56"/><!-- THE COLOR OF THIS VOXEL. USED WHEN CALCULATING COLOR SHIFT -->
    <ColorMetalXZnY>Textures\Voxels\Grass_cm.dds</ColorMetalXZnY><!-- COLOR & METALNESS TEXTURE -->
    <ColorMetalY>Textures\Voxels\Grass_cm.dds</ColorMetalY><!-- OPTIONAL Y TEXTURES ARE USED AS OVERRIDES ON THE HORIZONTAL FACE OF VOXELS. THIS IS THE FACE YOU NORMALLY SEE EXCEPT FOR STEEP SLOPES AND HOLES -->
    <NormalGlossXZnY>Textures\Voxels\Grass_ng.dds</NormalGlossXZnY><!-- NORMAL & GLOSS TEXTURE GOES HERE -->
    <NormalGlossY>Textures\Voxels\Grass_ng.dds</NormalGlossY>
    <ExtXZnY>Textures\Voxels\Grass_add.dds</ExtXZnY><!-- EXTENDED (ADD) TEXTURE GOES HERE -->
    <ExtY>Textures\Voxels\GrassAndHayY_add.dds</ExtY>

    <SpecularPower>24</SpecularPower><!--  -->
    <SpecularShininess>0.364</SpecularShininess><!-- REFLECTIVITY OF THE GLOSS -->
    <Icon>Textures\GUI\Icons\Voxel\Grass.png</Icon><!-- THE ICON DISPLAYED BY VOXEL HAND TOOLS -->

    <!-- FAR1 TEXTURE -->
    <ColorMetalXZnYFar1>Textures\Voxels\Grass_Far1_cm.dds</ColorMetalXZnYFar1>
    <ColorMetalYFar1>Textures\Voxels\Grass_Far1_cm.dds</ColorMetalYFar1>
    <NormalGlossXZnYFar1>Textures\Voxels\Grass_Far1_ng.dds</NormalGlossXZnYFar1>
    <NormalGlossYFar1>Textures\Voxels\Grass_Far1_ng.dds</NormalGlossYFar1>
    <ExtXZnYFar1>Textures\Voxels\Grass_Far1_add.dds</ExtXZnYFar1>

    <!-- FAR2 TEXTURE -->
    <ColorMetalXZnYFar2>Textures\Voxels\Grass_Far1_cm.dds</ColorMetalXZnYFar2>
    <ColorMetalYFar2>Textures\Voxels\Grass_Far1_cm.dds</ColorMetalYFar2>
    <NormalGlossXZnYFar2>Textures\Voxels\Grass_Far1_ng.dds</NormalGlossXZnYFar2>
    <NormalGlossYFar2>Textures\Voxels\Grass_Far1_ng.dds</NormalGlossYFar2>
    <ExtXZnYFar2>Textures\Voxels\Grass_Far1_add.dds</ExtXZnYFar2>

    <!-- SCALING AND DISTANCE -->
    <InitialScale>5</InitialScale><!-- DEFINES HOW BIG THE TEXTURE IS -->
    <ScaleMultiplier>5</ScaleMultiplier><!-- DEFINES HOW MUCH THE TEXTURE SCALES AT DISTANCE -->
    <InitialDistance>5</InitialDistance><!-- RANGE WHERE SCALING STARTS -->
    <DistanceMultiplier>5.2</DistanceMultiplier><!-- MULTIPLIES DISTANCE RANGE -->

    <!-- FAR SCALING AND DISTANCE -->
    <Far1Distance>20</Far1Distance><!-- THE DISTANCE (IN METERS) AT WHICH "FAR1" TEXTURE WILL SHOW UP -->
    <Far2Distance>120</Far2Distance><!-- THE DISTANCE (IN METERS) AT WHICH "FAR2" TEXTURE WILL SHOW UP -->
    <Far1Scale>100</Far1Scale><!-- DEFINES HOW BIG THE "FAR1" TEXTURE IS -->
    <Far2Scale>300</Far2Scale><!-- DEFINES HOW BIG THE "FAR2" TEXTURE IS -->

    <Foliage Density="30" Type="Grass"><!-- HIGHER VALUES MEAN MORE GRASS -->
      <Size x=".55" y=".55"/><!-- THE SCALE OF THE GRASS (NOT THE ABSOLUTE SIZE). THIS SHOULD GENERALLY BE CHANGED UNIFORMLY -->
      <SizeVariation>.6</SizeVariation><!-- (INTENDED) RANGE OF RANDOM SIZE VARIATION / (ACTUAL) SIZE MULTIPLIER -->

      <!-- GRASS TEXTURES GO HERE. YOU CAN ADD AS MANY DIFFERENT GRASS TEXTURES AS YOU LIKE. THE MORE YOU ADD, THE MORE DIVERSE AND UNIQUE YOUR GRASS WILL BE.  -->
      <!-- COLOR & ALPHA TEXTURES ARE ADDED TO Color ATTRIBUTES. NORMAL & GLOSS TEXTURES ARE ADDED TO Normal ATTRIBUTES. THE Frequency ATTRIBUTE CONTROLS HOW OFTEN EACH TEXTURE PAIR IS USED. -->
      <Variation Color="Textures\Models\Environment\Grass\Grass_01_cm.dds" Normal="Textures\Models\Environment\Grass\Grass_01_ng.dds" Frequency="1"/>
      <Variation Color="Textures\Models\Environment\Grass\Grass_01_cm.dds" Normal="Textures\Models\Environment\Grass\Grass_01_ng.dds" Frequency="1"/>
      <Variation Color="Textures\Models\Environment\Grass\Grass_03_cm.dds" Normal="Textures\Models\Environment\Grass\Grass_03_ng.dds" Frequency="1"/>
      <Variation Color="Textures\Models\Environment\Grass\Grass_04_cm.dds" Normal="Textures\Models\Environment\Grass\Grass_04_ng.dds" Frequency="0.3"/>
      <Variation Color="Textures\Models\Environment\Grass\Grass_05_cm.dds" Normal="Textures\Models\Environment\Grass\Grass_05_ng.dds" Frequency="1"/>
      <Variation Color="Textures\Models\Environment\Grass\Grass_06_cm.dds" Normal="Textures\Models\Environment\Grass\Grass_06_ng.dds" Frequency="2"/>
      <Variation Color="Textures\Models\Environment\Grass\Grass_07_cm.dds" Normal="Textures\Models\Environment\Grass\Grass_07_ng.dds" Frequency="1"/>
      <Variation Color="Textures\Models\Environment\Grass\Grass_08_cm.dds" Normal="Textures\Models\Environment\Grass\Grass_08_ng.dds" Frequency="1"/>
      <Variation Color="Textures\Models\Environment\Grass\Grass_09_cm.dds" Normal="Textures\Models\Environment\Grass\Grass_09_ng.dds" Frequency="0.5"/>
      <Variation Color="Textures\Models\Environment\Grass\Grass_10_cm.dds" Normal="Textures\Models\Environment\Grass\Grass_10_ng.dds" Frequency="1"/>
      <Variation Color="Textures\Models\Environment\Grass\Grass_11_cm.dds" Normal="Textures\Models\Environment\Grass\Grass_11_ng.dds" Frequency="0.3"/>
      <Variation Color="Textures\Models\Environment\Grass\Grass_12_cm.dds" Normal="Textures\Models\Environment\Grass\Grass_12_ng.dds" Frequency="2"/>
      <Variation Color="Textures\Models\Environment\Grass\Grass_13_cm.dds" Normal="Textures\Models\Environment\Grass\Grass_13_ng.dds" Frequency="0.2"/>
    </Foliage>

    <!-- THE MATERIAL THAT WILL APPEAR IF THE VOXEL IS DAMAGED. THIS DOESN'T AFFECT MINING. -->
    <DamagedMaterial>Soil</DamagedMaterial>
  </Definition>
What you should know is that the grass you see in a screenshot consists of the voxel that makes up the ground and the grass that grows from the voxel.
Understanding how voxel textures are made
The following lines of code define the textures for the base voxel. These textures define how the ground will look.
    <ColorMetalXZnY>Textures\Voxels\Grass_cm.dds</ColorMetalXZnY>
    <ColorMetalY>Textures\Voxels\Grass_cm.dds</ColorMetalY>
    <NormalGlossXZnY>Textures\Voxels\Grass_ng.dds</NormalGlossXZnY>
    <NormalGlossY>Textures\Voxels\Grass_ng.dds</NormalGlossY>
    <ExtXZnY>Textures\Voxels\Grass_add.dds</ExtXZnY>
    <ExtY>Textures\Voxels\GrassAndHayY_add.dds</ExtY>
You may have noticed that for each texture there are two lines, a XZnY line and a Y line. Only the XZnY lines are strictly necessary to make the voxel work. The Y lines could be left out completely. The Y lines work by overriding the texture on the Y face of the voxels. This face is usually the one that is horizontal and is the one seen most often in the game. Overriding the Y face gives you the ability to use different textures for the other faces. This is done most often in Medieval Engineers for the mountains. That way the steep slopes can have a different texture than the mountain tops. This can also be done with other kinds of voxels, like Grass, but the results are not perfect. See the screenshot in the next section for a demonstration.
If you skip the Y lines for now that still gives you three textures for one voxel. WHY? Medieval Engineers is a DirectX 11 game that uses Physically Based Rendering (PBR). This means that material textures contain information for color, metalness, normal mapping, gloss, ambient occlusion, emissivity, and roughness (dirt). The VRage engine also supports color masking which is outside of the standard PBR texturing. So you have 8 channels to work with and three files. Here's how the texture channels are packed for voxel materials.
    ////////////////////////////////////
    // Voxel Channels
    ////////////////////////////////////

    // CM
    RGB: Color
    A: Metal (0=Black)

    // NG
    RGB: Normal
    A: Gloss (0=Black)

    // ADD
    R: Ambient Occlusion (0=White)
    G: Emissive NOT USED (0=Black)
    B: Roughness (dirt) NOT USED (0=?)
    A: Color Shift (0=Black)
That means the cm texture <ColorMetalXZnY>Textures\Voxels\Grass_cm.dds</ColorMetalXZnY> contains color information in the Red, Green, and Blue channels, and Metalness information in the Alpha channel. Metalness defines the metallicity of a material, white being full metal and black being non-metal.
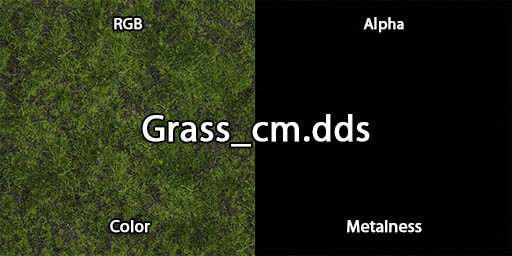
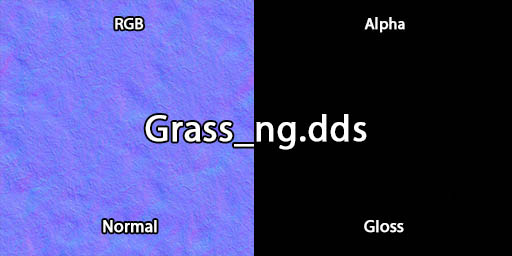
The ng texture <NormalGlossXZnY>Textures\Voxels\Grass_ng.dds</NormalGlossXZnY> contains normal mapping in the Red, Green, and Blue channels, and Gloss information in the Alpha channel. Gloss defines the shininess of the material, white being very glossy/shiney and black being completely dull. Normal mapping, if you are not aware, is a way of creating 3D lighting on a 2D surface. Normal mapping is a more modern version of bump mapping.
The add texture <ExtXZnY>Textures\Voxels\Grass_add.dds</ExtXZnY> contains ambient occlusion mapping in the Red channel and color shift mapping in the Alpha channel. Ambient occlusion mapping is used by shaders to create more realistic lighting, where white creates no occlusion and black creates a lot of occlusion. The Green and Blue channels are not used for voxel materials at this time.

Changing the voxel color
All textures must be saved in DDS format with BC7 compression.
We recommend using the Intel® Texture Works Plugin for Photoshop or Microsoft/DirectXTex
TextConv can be run from the command line. There is also a GUI project at https://github.com/Mirzipan/TexConvGUI
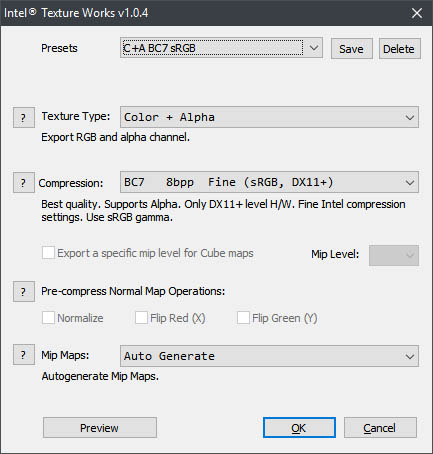
Use the following settings with texture works
Texture Type: Color + Alpha
Compression: BC7 8bpp fine (sRGB, DX11+) for cm and add / BC7 8bpp fine (Linear, DX11+) for ng
Mip Maps: Auto Generate
Open the first “Grass_cm.dds” texture in Photoshop and add a Hue/Saturation adjustment layer on top. Use the following settings to make the color a warm autumn orange.
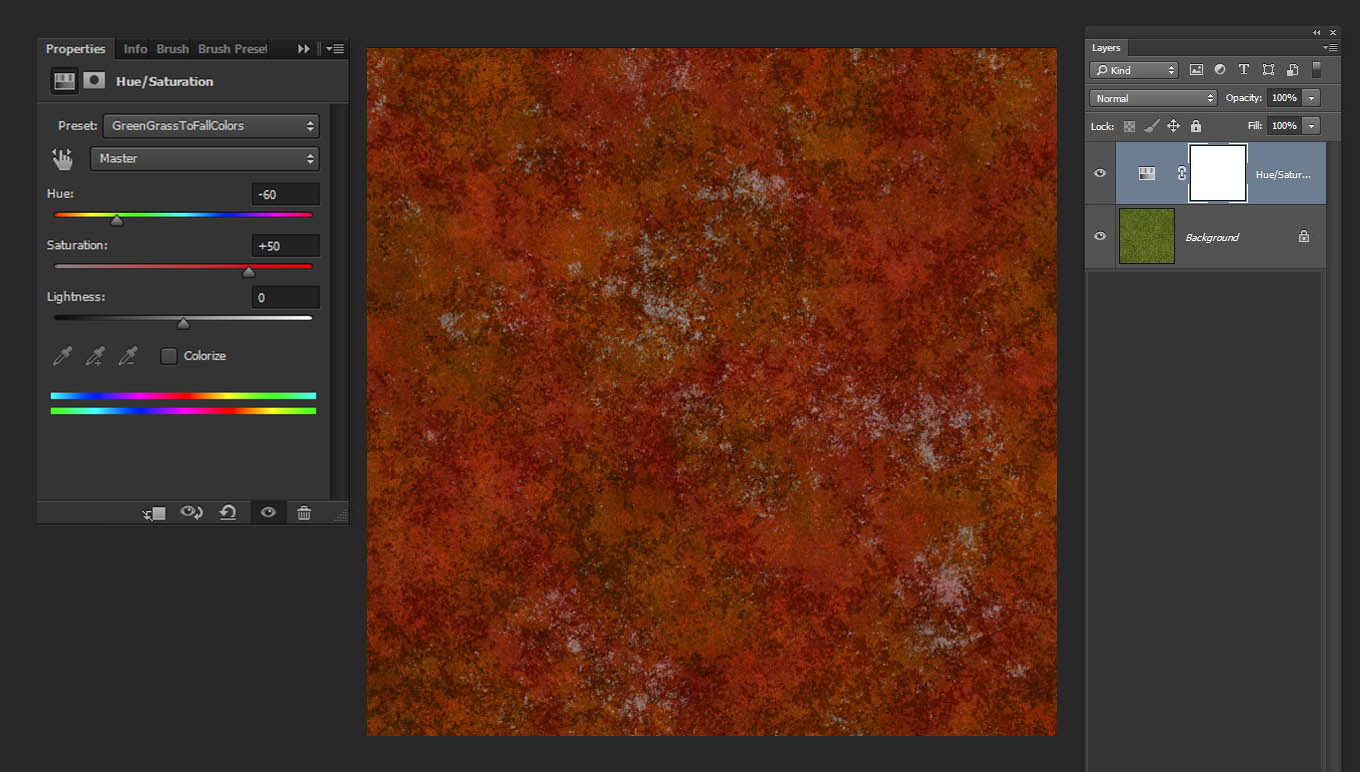
Now re-save this file using BC7 sRGB compression.
Change your OrangeVoxels.sbc file’s definitions to use this file instead of the default one. Now is a good time to change all of the base textures.
    <ColorMetalXZnY>Textures\Voxels\GrassOrange_cm.dds</ColorMetalXZnY>
    <ColorMetalY>Textures\Voxels\GrassOrange_cm.dds</ColorMetalY>
    <NormalGlossXZnY>Textures\Voxels\GrassOrange_ng.dds</NormalGlossXZnY>
    <NormalGlossY>Textures\Voxels\GrassOrange_ng.dds</NormalGlossY>
    <ExtXZnY>Textures\Voxels\GrassOrange_add.dds</ExtXZnY>
    <ExtY>Textures\Voxels\GrassOrange_add.dds</ExtY>
If you load the game now to see what happened to the grass, you will see that you've changed the color of the Grass Voxel Material (surface) only, while the grass which grows on it remains green.
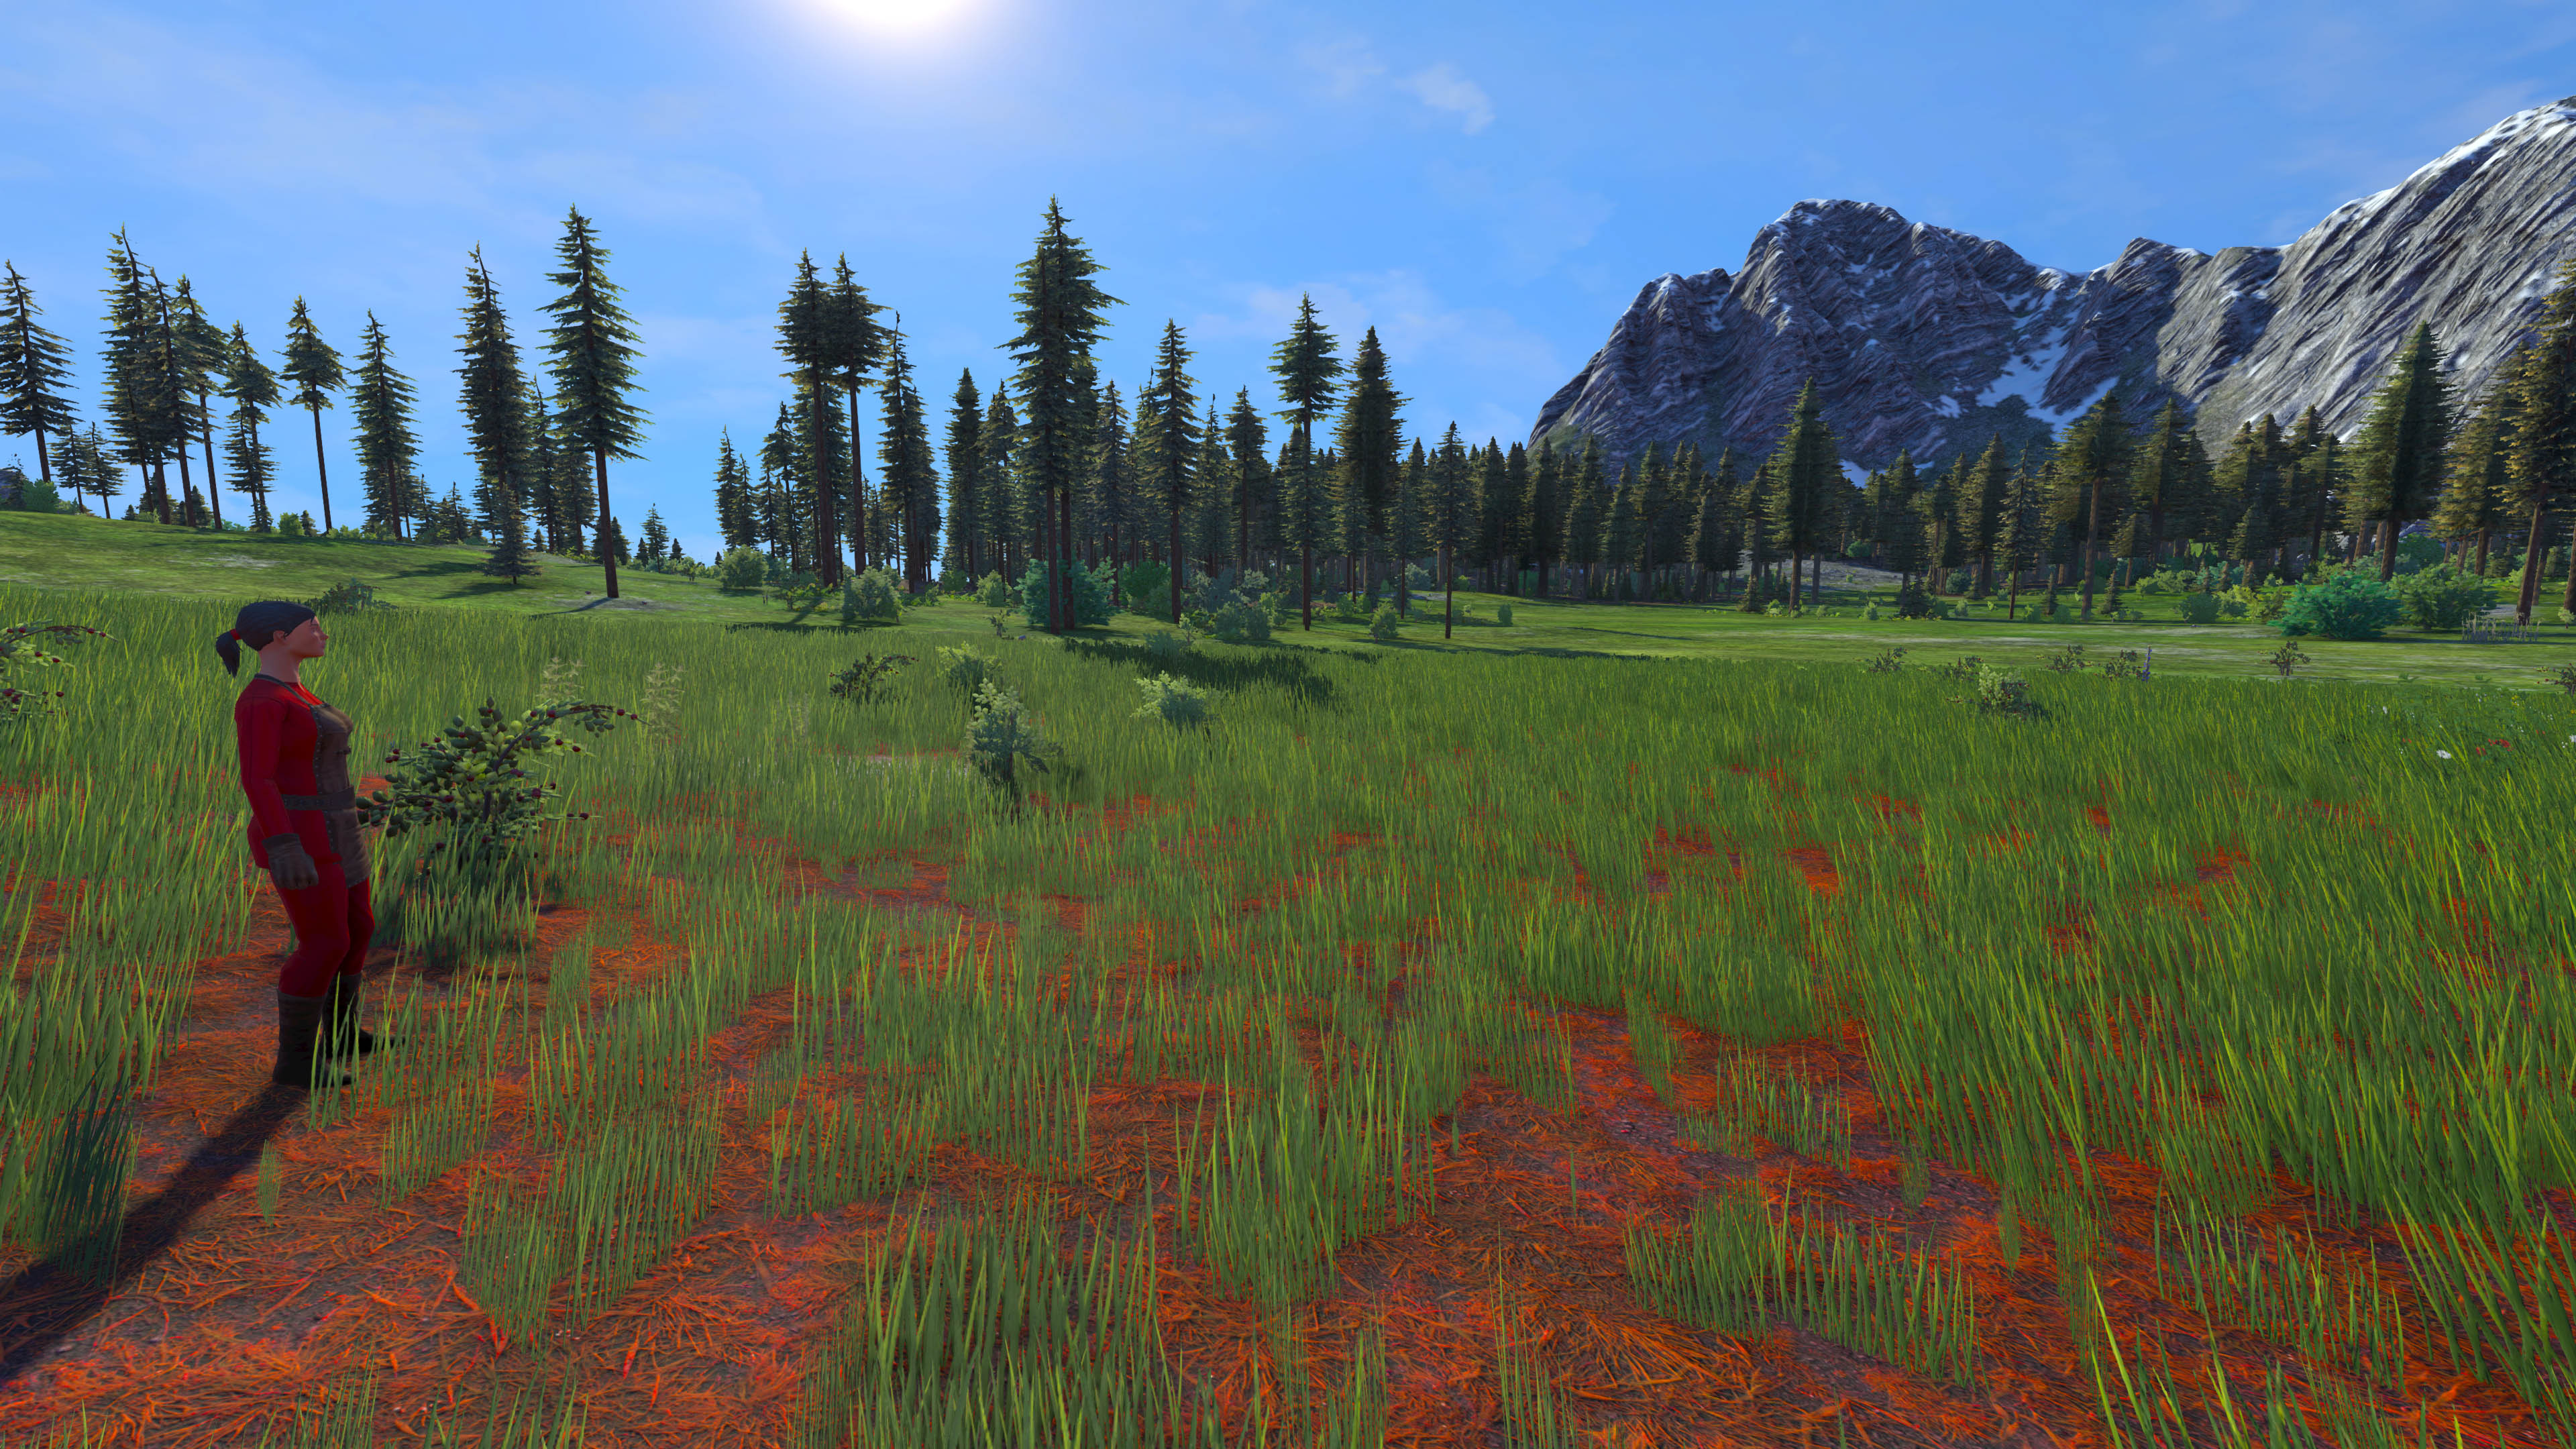
You will need to also change the grass but first there are some details to work out with the voxels.
- Numbered list item
Mod Compatibility
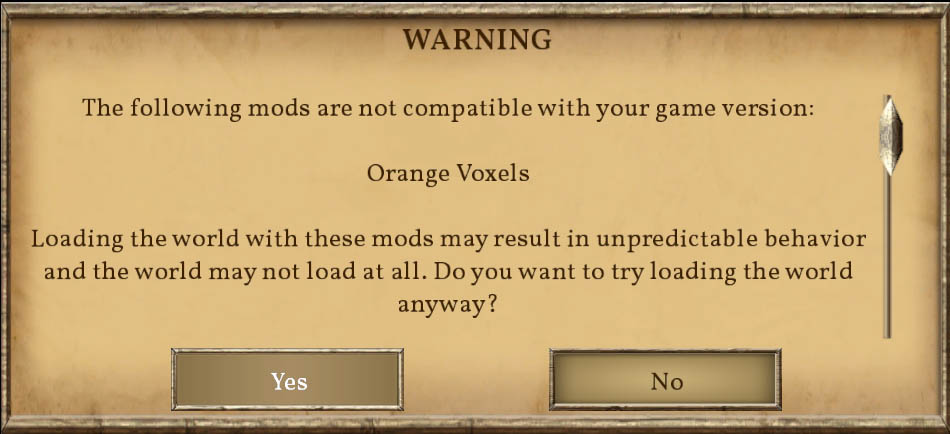
You may have noticed a message box with the following warning.
The solution to this is to create a metadata.mod file in your mod folder. See the Mod Metadata guide for details.
Voxel scaling
If you look at the voxels without the grass enabled you may notice a couple of things. The first thing is the voxels further away are still green instead of orange. These are the far textures and you can set those in the next section. If you look closely at the size of the textures on the voxels you may be able to see that they are not all the same size. In fact the voxels scale based on distance. While this isn't so critical with grass it will affect other voxels more. Image a brick voxel where the bricks all appear to be the same size no matter how far away they are. The solution to this is voxel scaling.
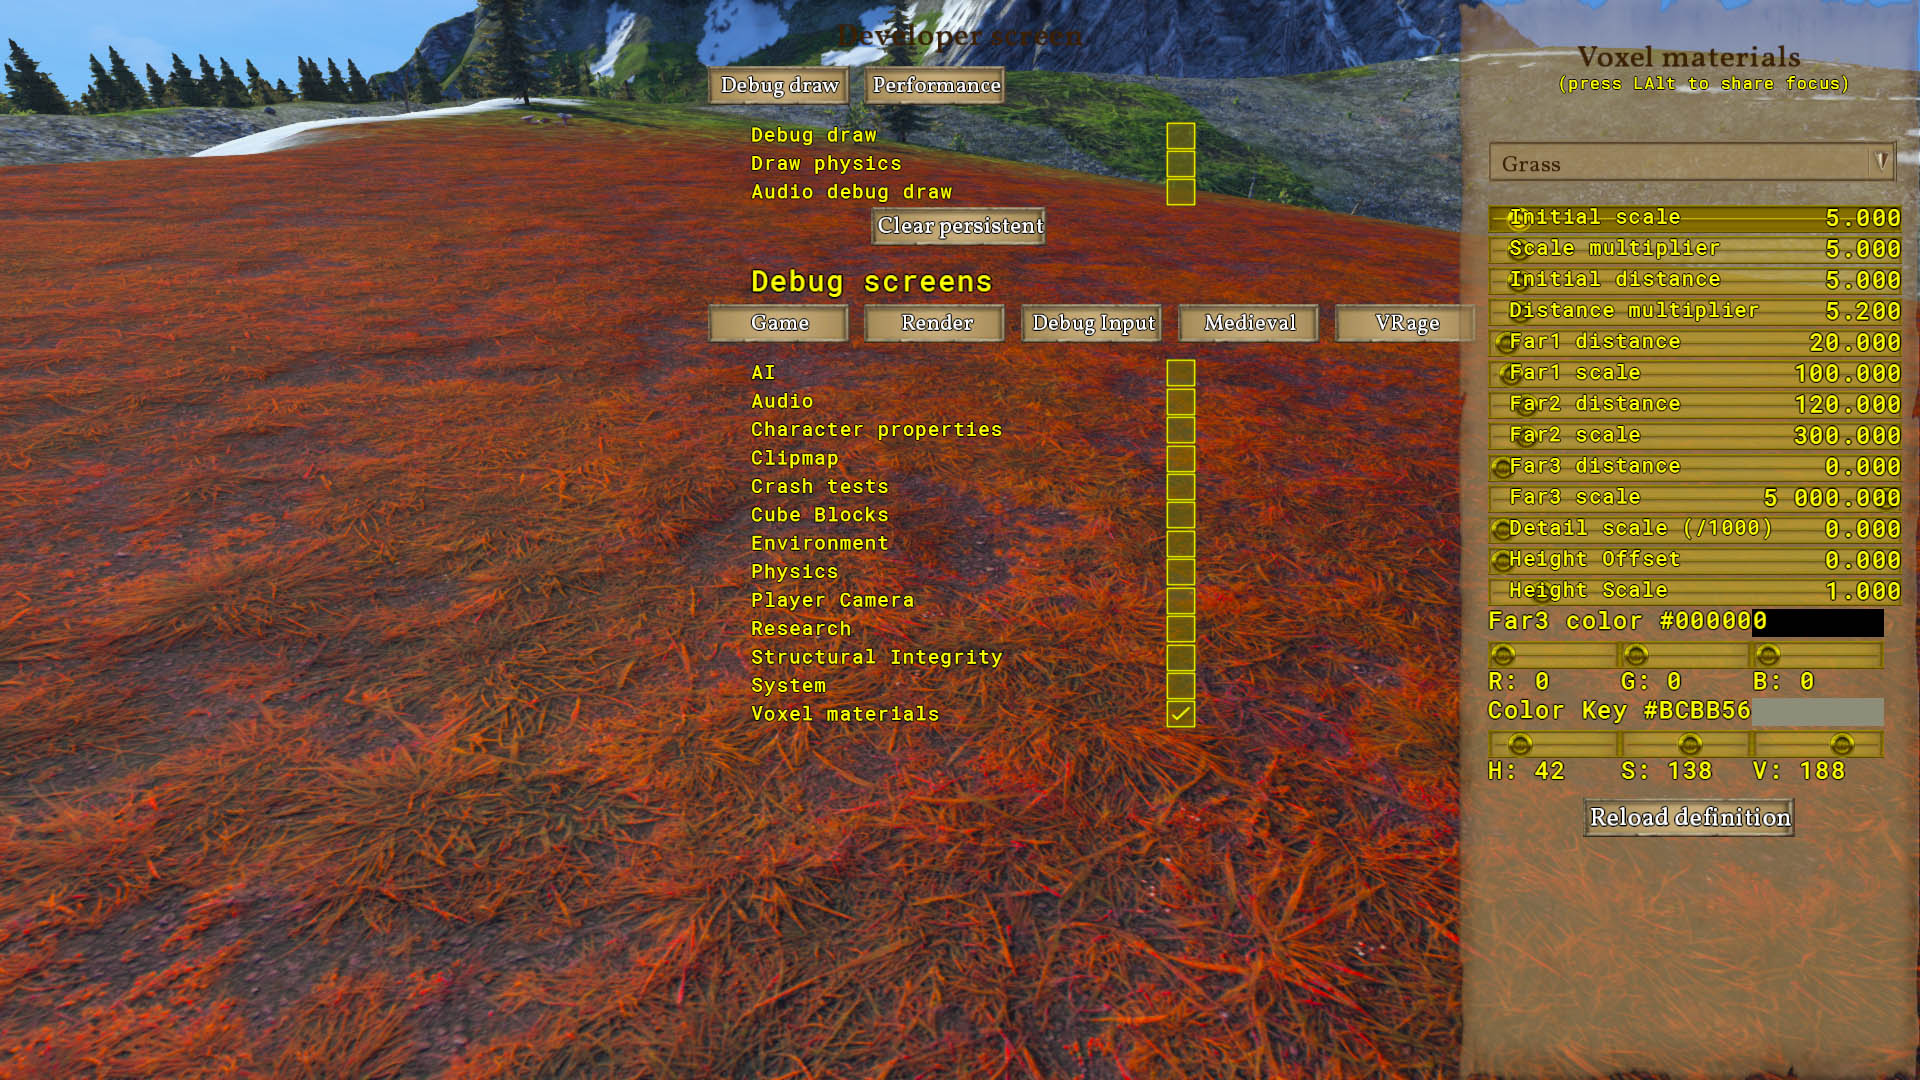
You can experiment with the voxel scaling by opening the developer debug screen (![]() +
+![]() ) and selecting Voxel Materials at the bottom. Hold
) and selecting Voxel Materials at the bottom. Hold ![]() to interact with the sliders on the debug panel. You can press
to interact with the sliders on the debug panel. You can press ![]() +
+![]() again to close the main debug screen while keeping the voxel materials screen open. Press
again to close the main debug screen while keeping the voxel materials screen open. Press ![]() to close the screen. All of the sliders in this screen relate to settings in the voxel material definition. They can all be used in the definition but some settings are ignored or not useful in Medieval Engineers. Far3 is an example of this. It replaces the voxel texture with a solid color. This is useful when viewing voxels from many kilometers away, such as from space. Since Medieval Engineers isn't meant to be played from space, this extra setting isn't helpful.
to close the screen. All of the sliders in this screen relate to settings in the voxel material definition. They can all be used in the definition but some settings are ignored or not useful in Medieval Engineers. Far3 is an example of this. It replaces the voxel texture with a solid color. This is useful when viewing voxels from many kilometers away, such as from space. Since Medieval Engineers isn't meant to be played from space, this extra setting isn't helpful.
Far textures
Now that you're acquainted with cm, ng, and add files, you shouldn't have much trouble setting up Far1 and Far2 textures. The reason these textures are used is twofold, to reduce the small details on textures that are not close to the player and to increase the large details on those same textures. Again, the place where this is most obvious is the mountains. They have big beautifully detailed textures on the sides that look great at a distance. Since these are only textures they would look incredibly bad up close where there is no geometry to support the rugged looking far textures. Up close, the base textures load and they match the voxel geometry much closer. Since Medieval Engineers is meant to be played from the ground (not flying around) the differences between base textures and far textures can be quite noticeable and still not break immersion in the game.
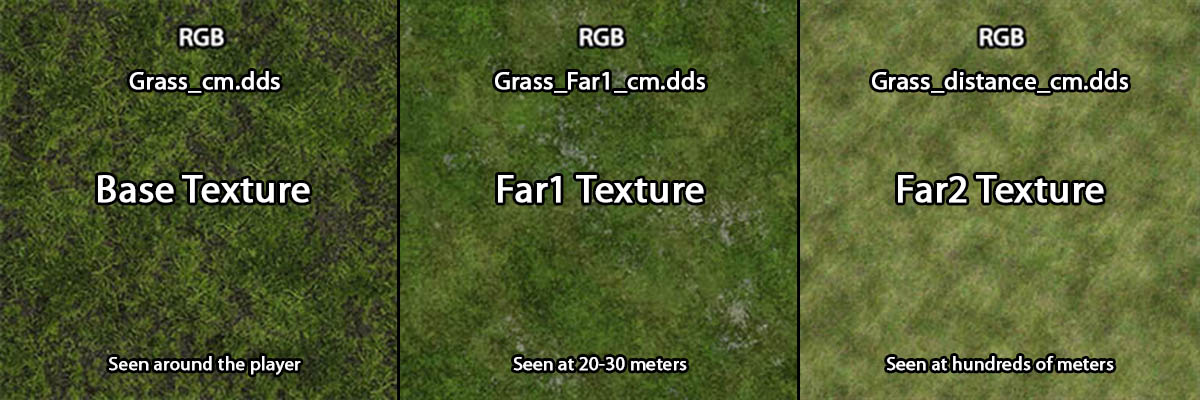
Here are the cm files for Grass. The base texture, Far1 texture, and Far2 (distant) texture.
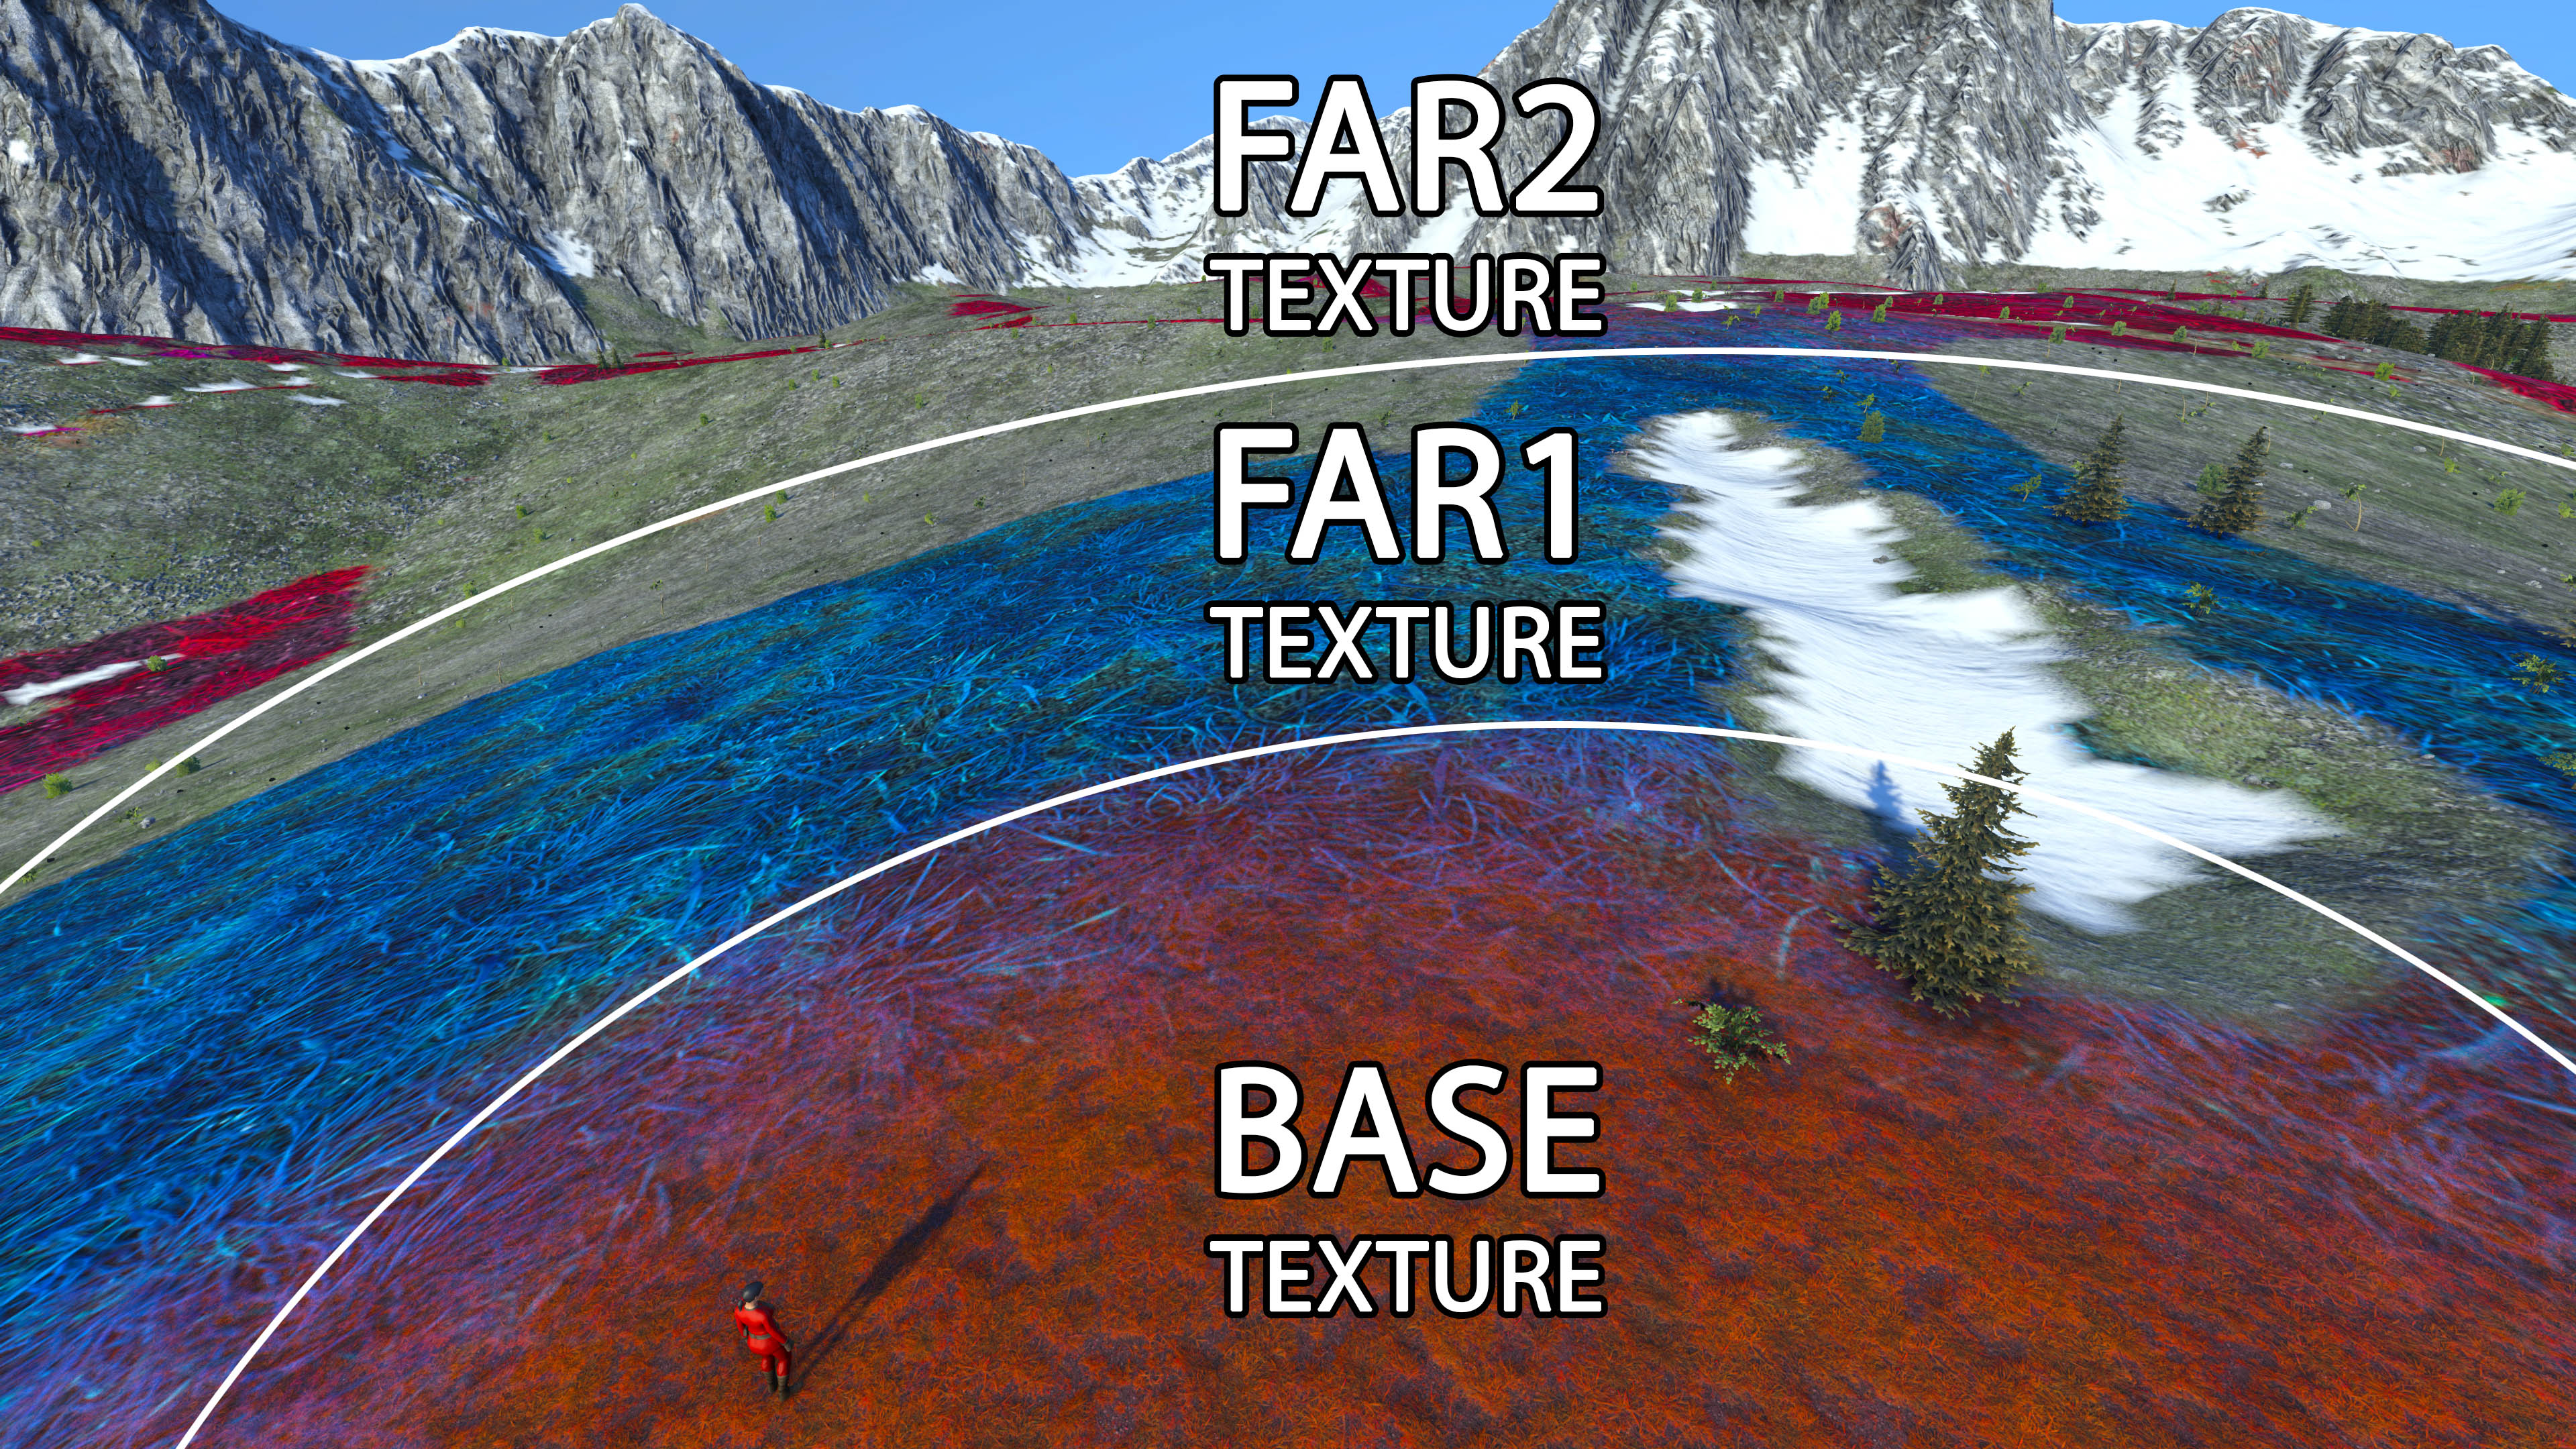
These textures form concentric circles around the player. To illustrate this point, the image below was made with a blue texture in Far1 and a red texture in Far2. Take note of how little detail can be seen in the bland Far2 texture. In contrast, the mountains in the background have very large scale details in their far textures.
Open the Far1 and distant textures in Photoshop and add the same Hue/Saturation adjustment layer on top. You may want to adjust it to better match the coloring of the base texture. Save them the same way as the others and then add them to your sbc file.
<ColorMetalXZnYFar1>Textures\Voxels\GrassOrange_Far1_cm.dds</ColorMetalXZnYFar1>
<NormalGlossXZnYFar1>Textures\Voxels\GrassOrange_Far1_ng.dds</NormalGlossXZnYFar1>
<ExtXZnYFar1>Textures\Voxels\GrassOrange_Far1_add.dds</ExtXZnYFar1>

<ColorMetalXZnYFar2>Textures\Voxels\GrassOrange_distance_cm.dds</ColorMetalXZnYFar2>
<NormalGlossXZnYFar2>Textures\Voxels\GrassOrange_distance_ng.dds</NormalGlossXZnYFar2>
<ExtXZnYFar2>Textures\Voxels\GrassOrange_Far1_add.dds</ExtXZnYFar2>
You may have noticed that the same add file was used for both Far1 and Far2. Normally a small dummy file is substituted in far textures to save memory since ambient occlusion doesn't really play much of a role at such a distance. However, Medieval Engineers also has color shift information in the add texture which is necessary if players are to be able to find iron ore. Using the same add file for both just saves from adding an extra texture for each voxel.
You may want to load the game and use the Voxel Materials screen again. This time to find appropriate far distance and scale settings. These are a little less complex than the base scaling settings. The distance is in meters.
<Far1Distance>20</Far1Distance>
<Far2Distance>120</Far2Distance>
<Far1Scale>100</Far1Scale>
<Far2Scale>300</Far2Scale>
</sousyntaxhighlightrce>
The screenshot below has all of the orange voxel texture loaded with reasonable distances and scaling.
[[File:Voxels 4-6.jpg|center|1200px]]
===Y texture overrides===
You may still be wondering about those Y texture overrides discussed with the base textures. Below is an example of overriding a purple base texture with an orange Y override.
[[File:1200px-Voxels_4-2.jpg|center|1200px]]
As you can see the purple base texture blends in where the edge of the voxel becomes steep. However, on the other side of the hole you'll notice that the orange is still showing. This is because voxels are not always perfectly aligned with the surface of the planet. This is because voxels are large, clustered, and cubic. They do not map well to the curved surface of the planet. They are stretched and bent at the surface to make things smooth. These means that there will be some inconsistencies in texturing. You'll want to be aware of this behavior when using Y overrides. It's best to keep your override textures and base textures similar so that they blend smoothly. Bigger differences can be made in the far textures, although they have almost no blending at all. This can be seen quite clearly on the edges of distant snow where it does not blend with the surrounding voxels. Instead it has jagged square edges.
===Understanding how grass textures are made===
The vanilla grass has 13 texture pairs to create a varied and interesting landscape. To simplify this guide, only three will be modified and used for the orange voxels. You can add more if you desire.
Open the grass cm textures in Photoshop. You'll notice these textures look extremely sloppy and there is information in the metalness channel. Well the trick is that these textures don't use metalness. Here's how the texture channels are packed for grass materials.
<pre>
////////////////////////////////////
// Grass Channels
////////////////////////////////////
// CM
RGB: Color
A: Transparency
// NG
RGB: Normal
A: Gloss
</pre>
There is no metalness channel, only a more 2D style Alpha channel transparency. It is necessary for the grass to have this alpha masking since it is not a 3D model.
Grasses are actually planes with alpha masks. This allows them to render quickly and be animated en masse.
<center>
[[File:Voxels 5-2.jpg|512px|frameless]] [[File:Voxels 5-5.jpg|512px|frameless]]
[[File:Voxels 5-3.jpg|512px|frameless]] [[File:Voxels 5-6.jpg|512px|frameless]]
[[File:Voxels 5-4.jpg|512px|frameless]] [[File:Voxels 5-7.jpg|512px|frameless]]
</center>
===Changing the grass color===
Apply the Hue/Saturation filter to the cm files.
[[File:Voxels 6-1.jpg|center]]
After you have saved the changes with appropriate compression, add the orange grasses to your sbc file.
<syntaxhighlight lang="xml" line>
<Foliage Density="30" Type="Grass">
<Size x=".55" y=".55"/>
<SizeVariation>.6</SizeVariation>
<Variation Color="Textures\Models\Environment\Grass\GrassOrange_01_cm.dds" Normal="Textures\Models\Environment\Grass\GrassOrange_01_ng.dds" Frequency="1"/>
<Variation Color="Textures\Models\Environment\Grass\GrassOrange_01_cm.dds" Normal="Textures\Models\Environment\Grass\GrassOrange_01_ng.dds" Frequency="1"/>
<Variation Color="Textures\Models\Environment\Grass\GrassOrange_03_cm.dds" Normal="Textures\Models\Environment\Grass\GrassOrange_03_ng.dds" Frequency="1"/>
</Foliage>
<SizeVariation> tag doesn't seem to be working correctly. Instead of allowing for variations it is only multiplying the size.
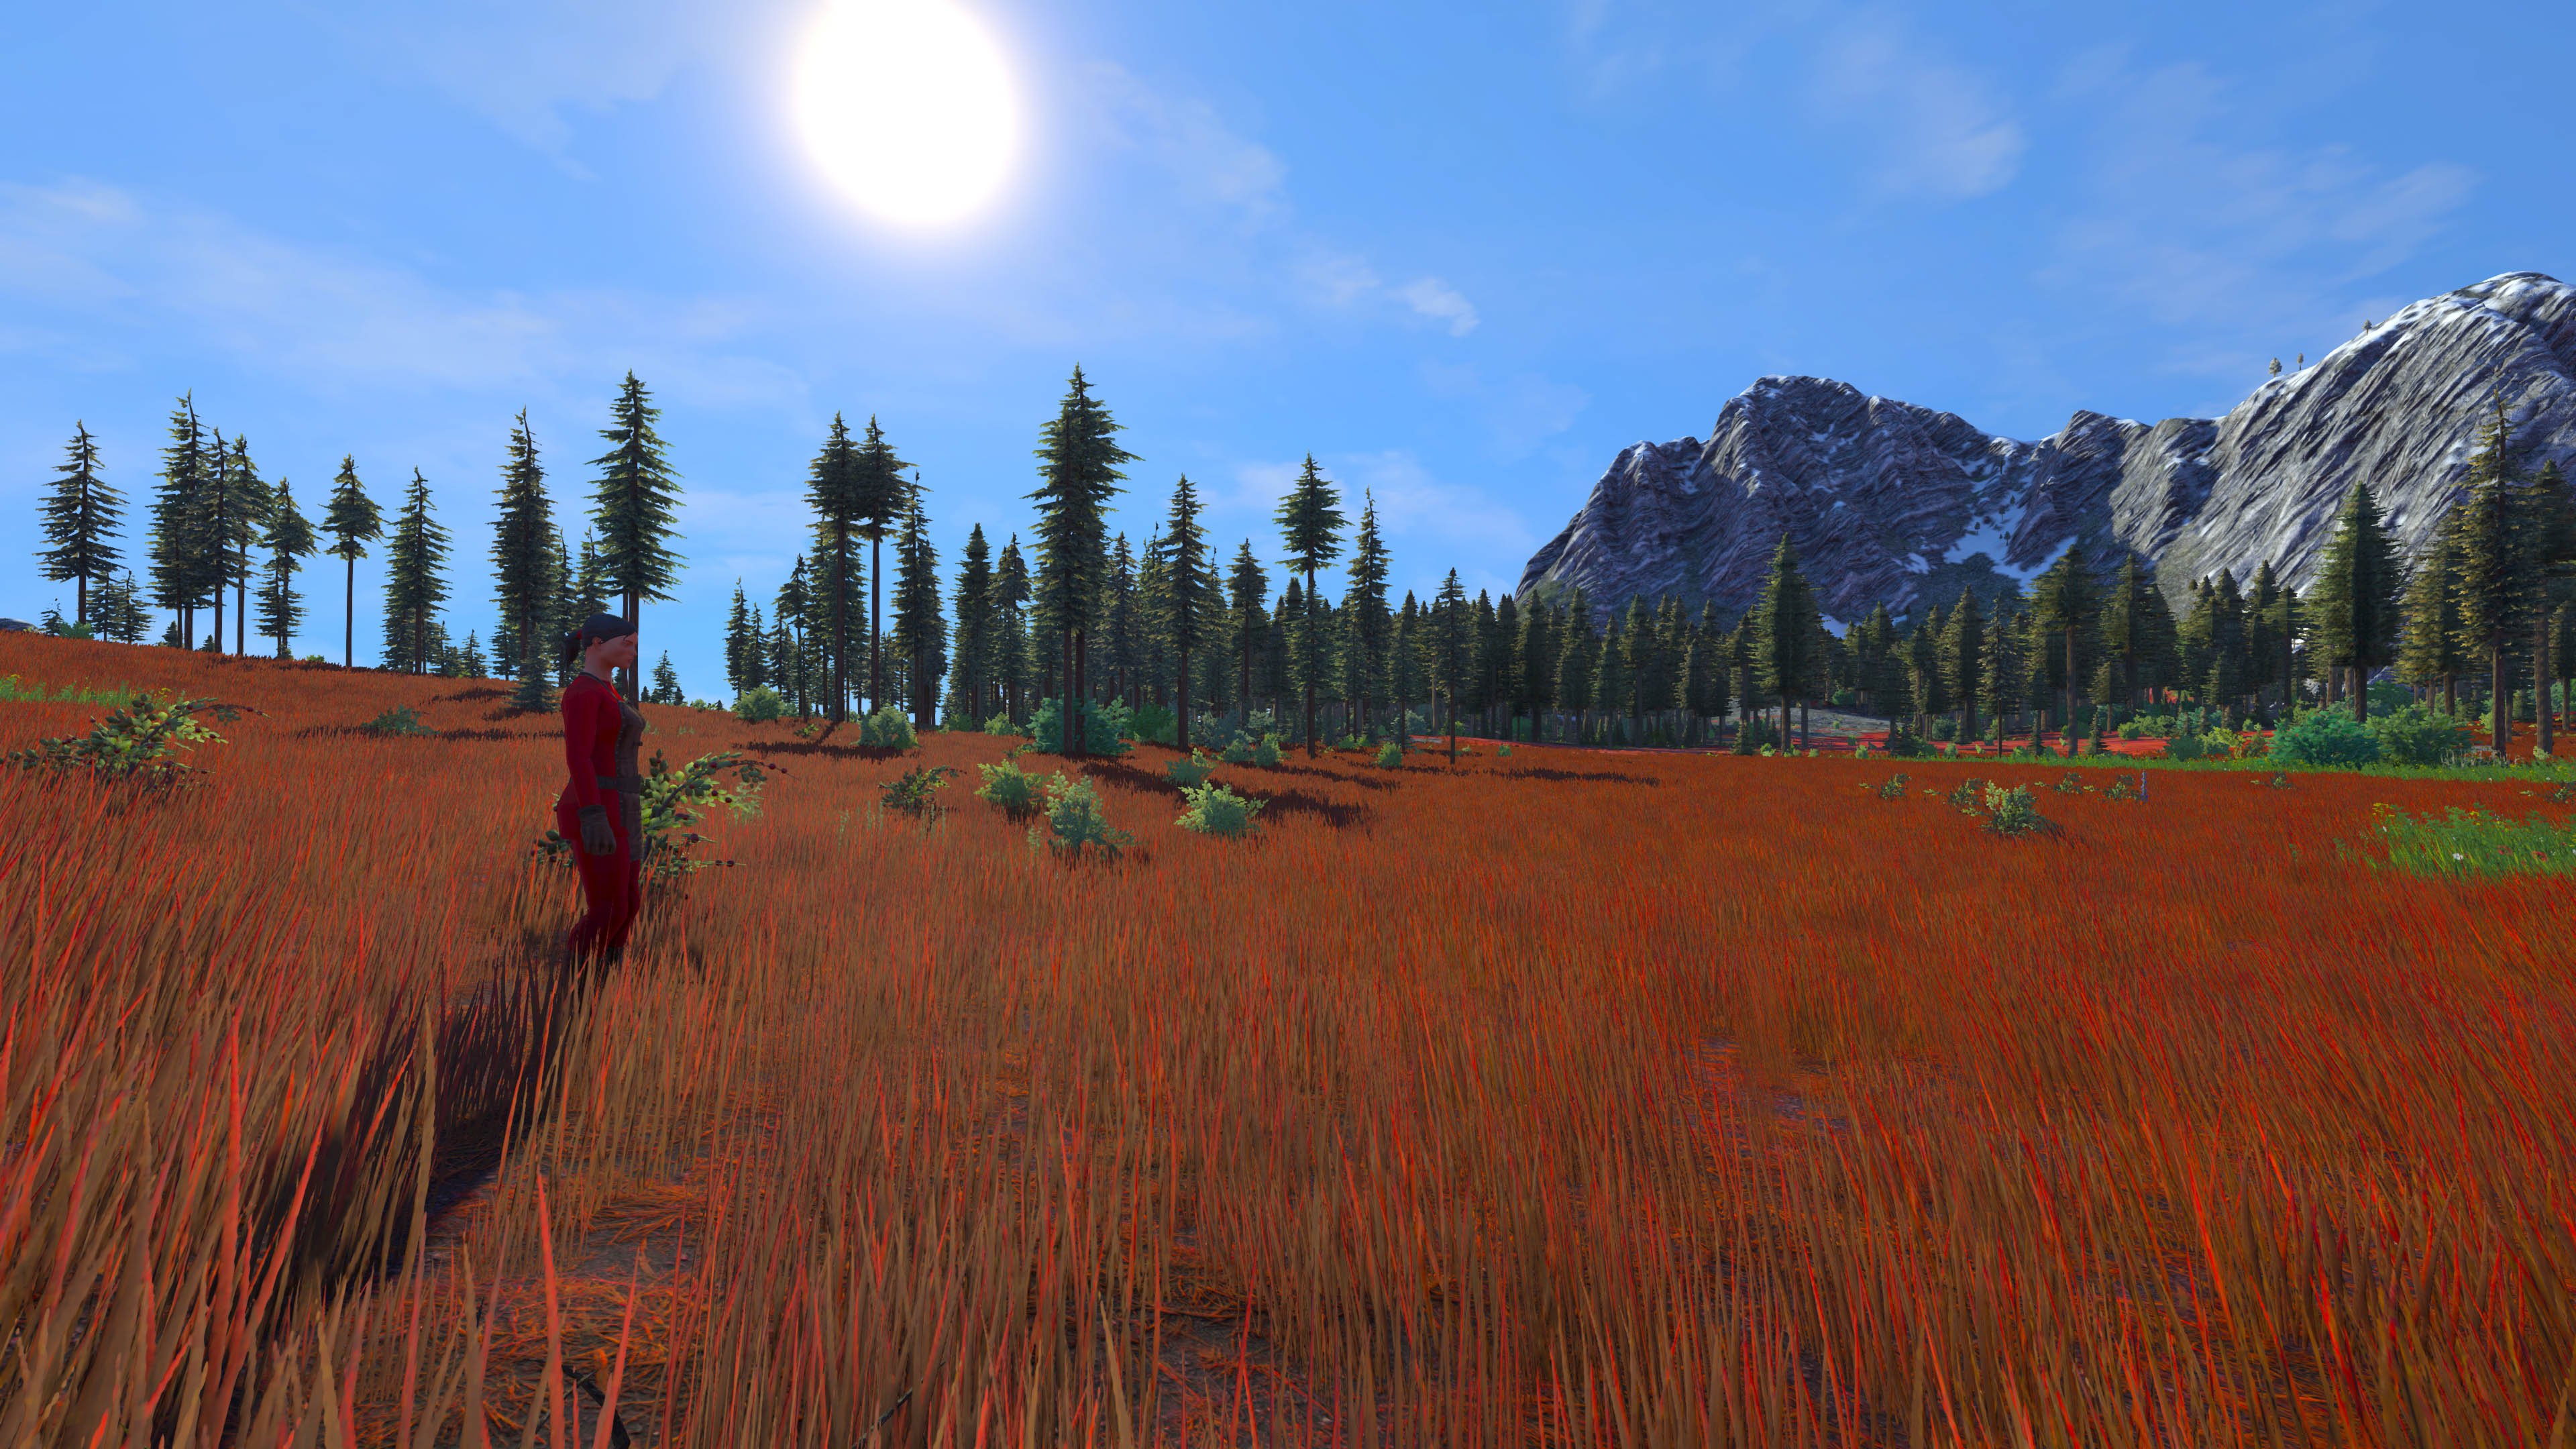
Reload the world and you should have some really rusty orange grass. It's like if grass turned colors in the autumn like the tree leaves!
Icon and color masking
There are a few small details to take care of. The first is the icon. It is a standard png file so open it in Photoshop, apply the Hue/Saturation, merge the adjustment layer down, and save.
Make sure to add it to the sbc file <Icon>Textures\GUI\Icons\Voxel\OrangeGrass.png</Icon>.

You may have noticed the <ColorKey Hex="#65210a"/> tag in the definition. You may have also been wondering about he color shift map in the add textures. Well here is how they work in Medieval Engineers.
The ColorKey is meant to represent the voxel's average color. This value is a starting point for color shifting. In the vanilla game there is only one color shift and that is from iron ore which turns the voxels red. In order to do that it must calculate how far to shift the colors. It does that by taking the difference of the the red color and the voxel's ColorKey value. The remainder is the amount the color is shifted.
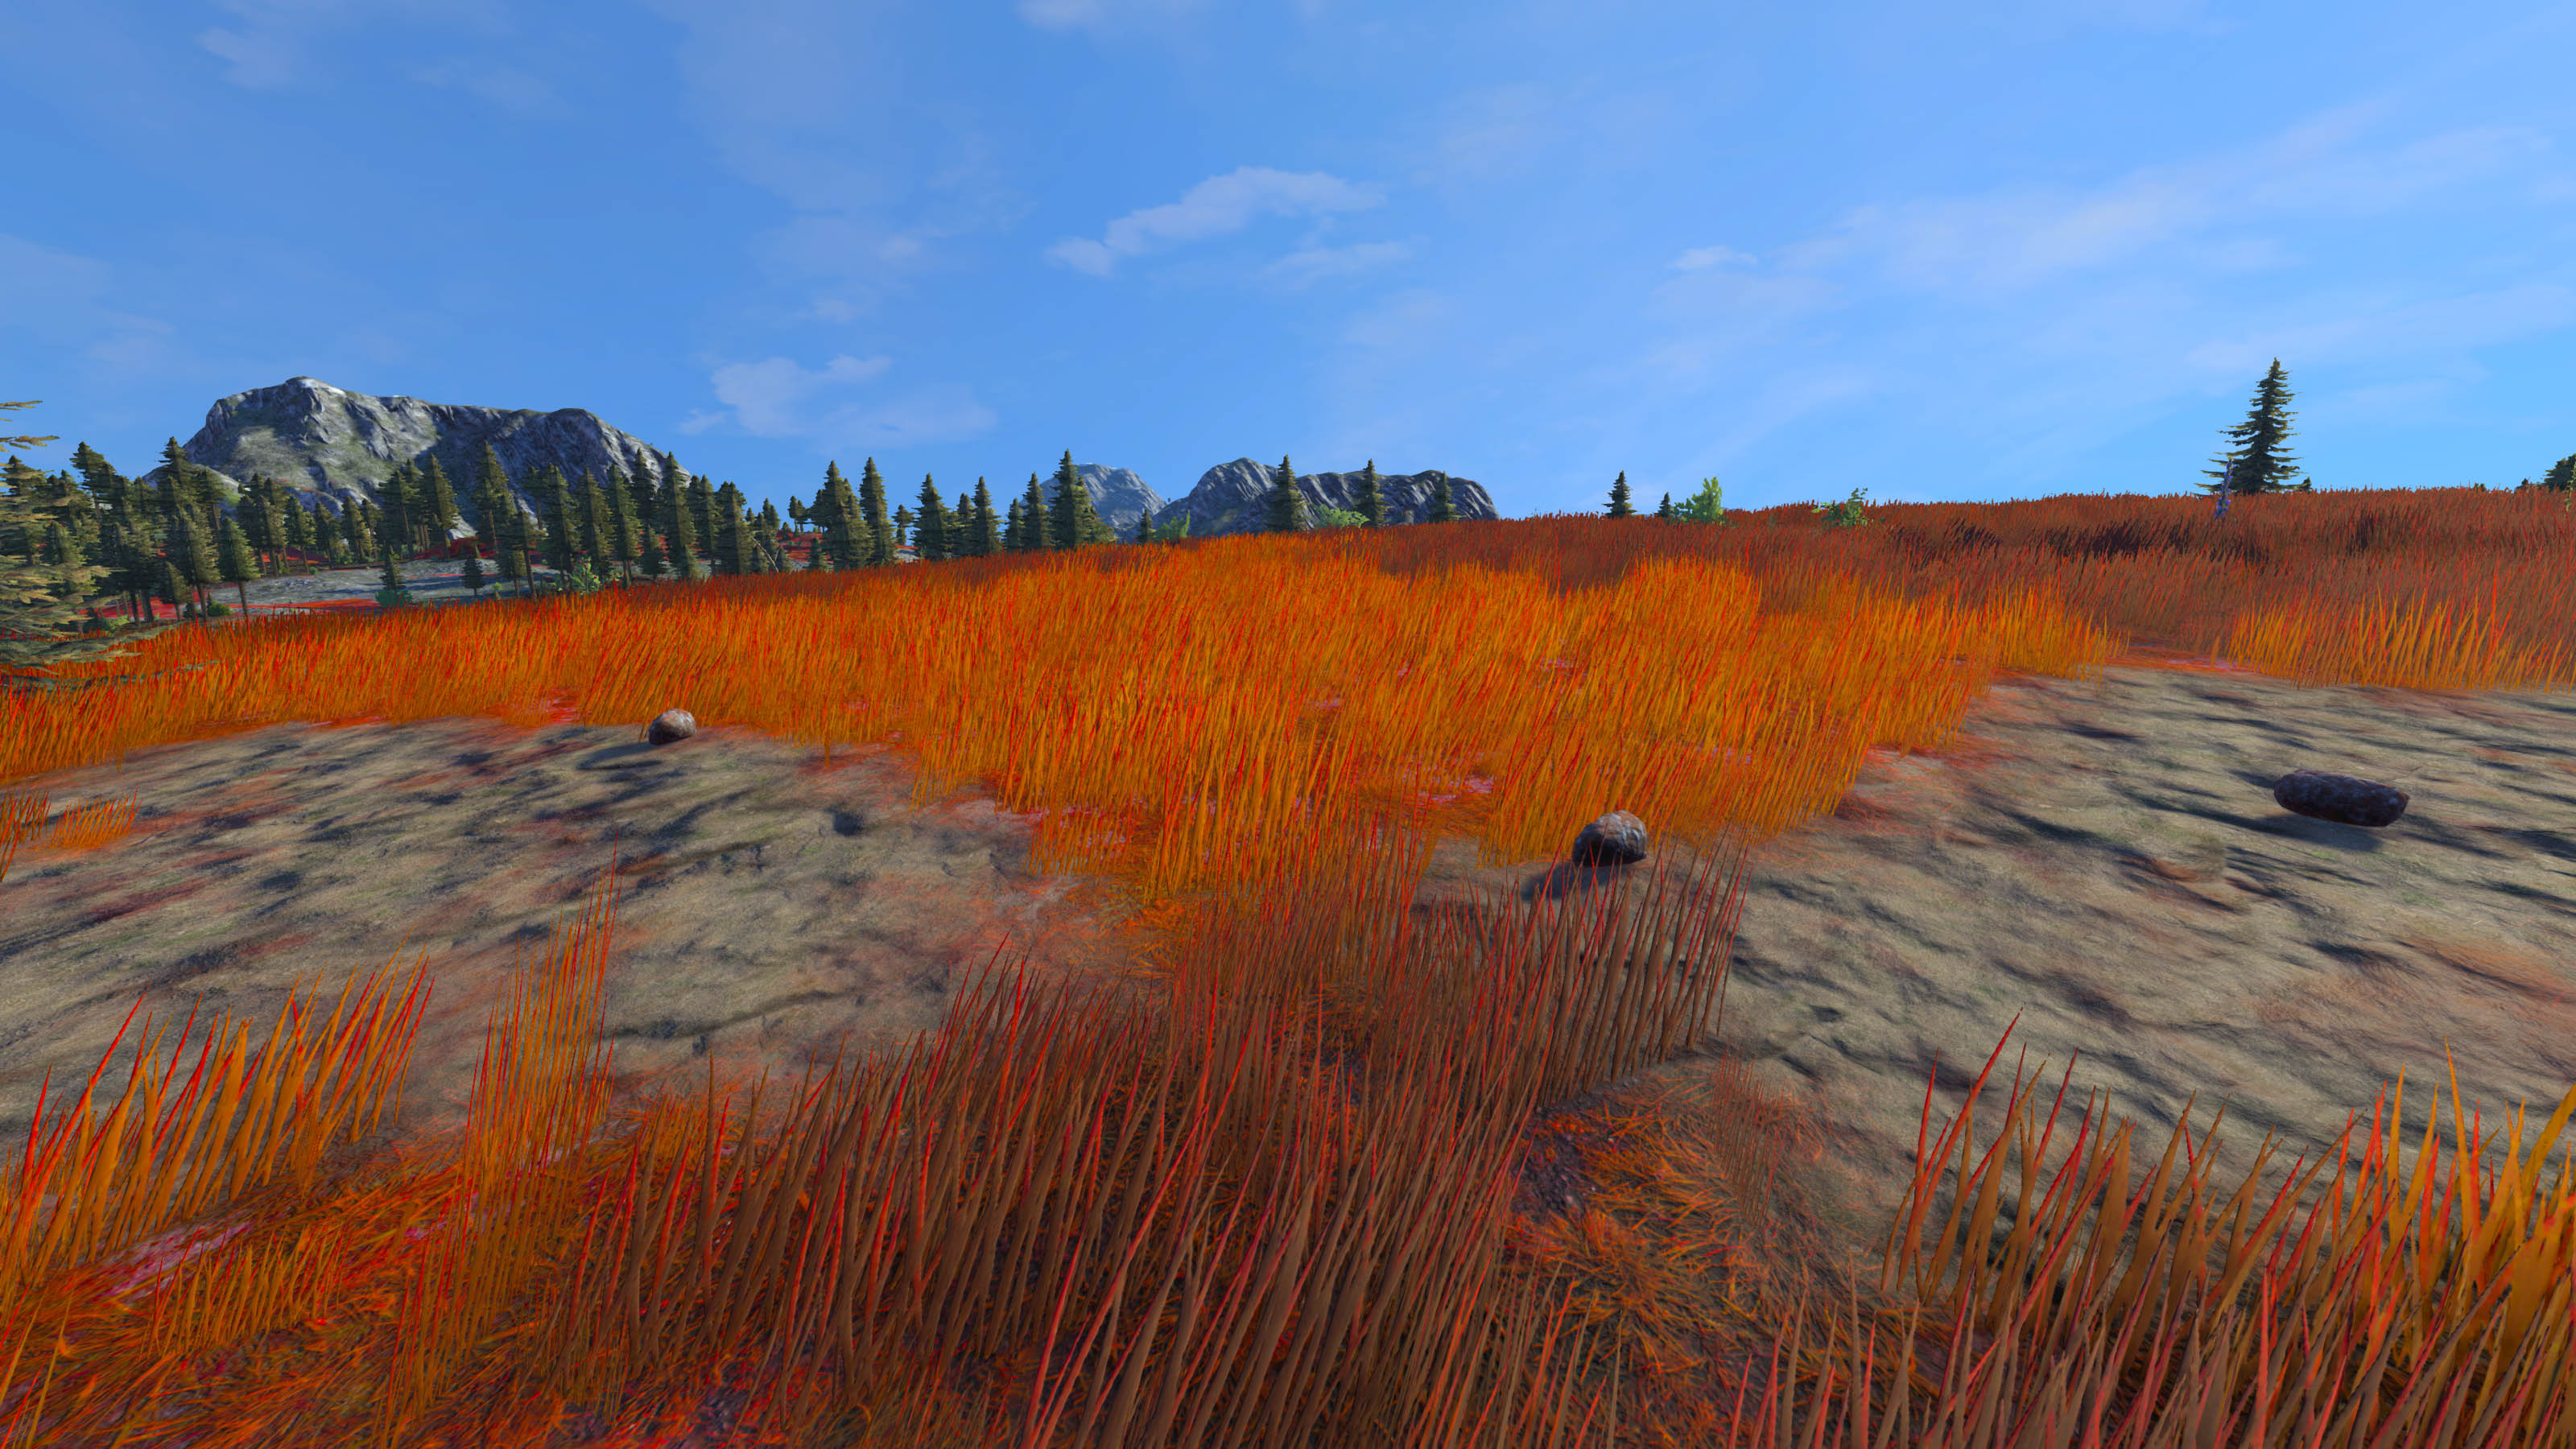
The color shift map is what defines which parts of the voxel get shifted. If the map was white then the entire voxel would get shifted completely and it would just be very red. The color shift map allows you to specify which areas get shifted and how much that shift is applied. In the screenshot below you'll notice some of the grass remains red while some of it becomes bright orange. This is partially due to the original colors but also due to the color shift map.
View the full Planet Modding Guide
