Keen:Planet Modding/Material Texture
| Version: | 0.4 |
Material Texture modding
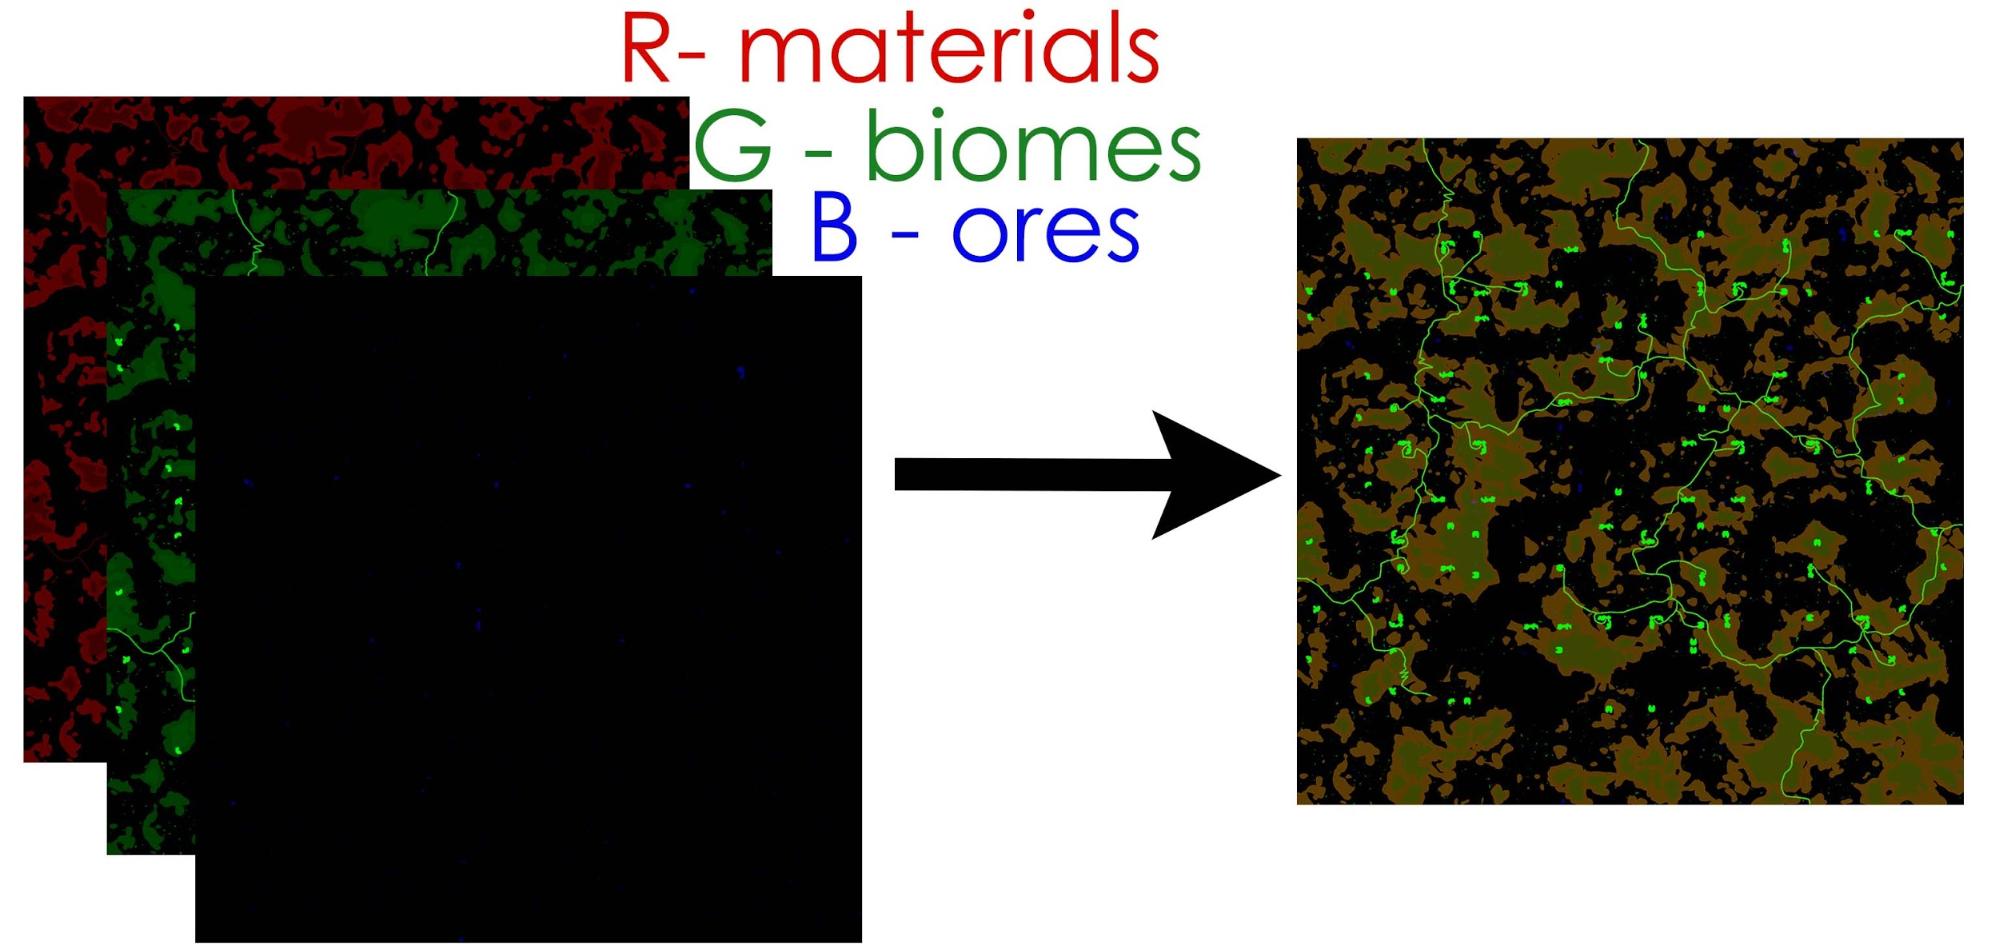
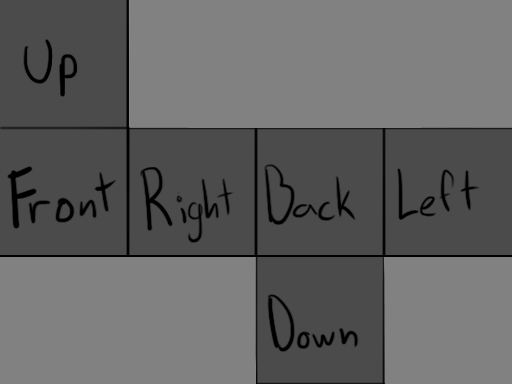
Material texture is used to store information about location of various planet surface features. These features are surface materials, biomes (trees, bots, plants,..etc) and where you can find ore. Each one of these uses one color channel. Surface materials use red channel. Biomes use green. Ores are in blue channel. We use 6 material textures (2048x2048) for each planet. You can find all our material textures here: Content\Data\PlanetDataFiles. Each planet has its own folder. The folder has to have the same name as the planet.
Illustration of how are the material textures connected to each other:
Texture creation
The process of material texture creation is really simple. You have two options:
Modifying the vanilla texture
Copy an existing map to your folder and overwrite the green channel and edit them to your liking This is highly recommended to avoid errors!
Creating a new texture
Step by step in Photoshop:
- Set both width and height to 2048 pixels
- (for smaller planets this can also be 1024 or less, but all textures need to have the same resolution! Even the heightmap)
- Set resolution - Pixels/Inch to 72.
- Set colour mode to RGB Colour - 8bit
- Now start painting with the pencil tool on each RGB Channel separately.
- Never on all three at once! (It will F. up everything - trust me).
Surface material definitions (grass, sand, snow)
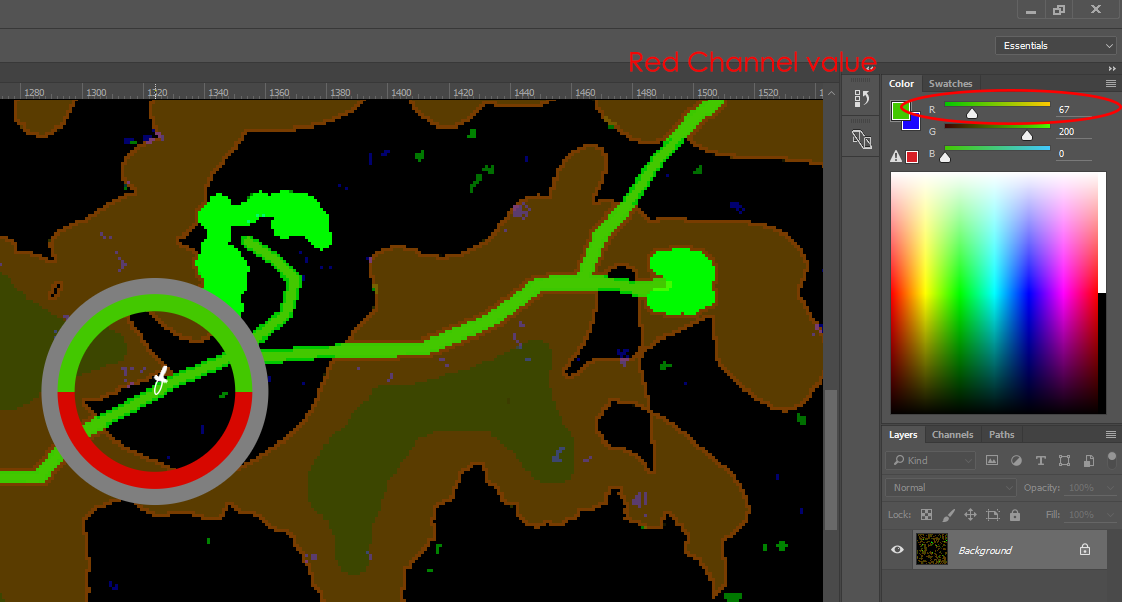
Surface “voxel materials” refers to what you know as grass, soil, stone.. We use red channel of the material texture to set where all the terrain appears. Then you need to write definitions in the Content\Data\PlanetGenerator.sbc to tell game which voxel should appear at specific red channel value. Example of the definition of road:
    <ComplexMaterials>
      <MaterialGroup Name="Road" Value="67">
        <Rule>
          <Layers>
            <Layer Material="Soil" Depth="2"/>
          </Layers>
          <Slope Min="0" Max="90"/>
        </Rule>
      </MaterialGroup>
    </ComplexMaterials>
Example of corresponding material texture with road:
Complex materials
Complex materials definition allows to paint the map with a set of “voxel coloring rules”. Meaning that one color value in red channel can color terrain with different voxels based on rules like slope, longitude or latitude and height. (So with our road example)
      <MaterialGroup Name="Forest_Grass" Value="120">
        <Rule>
          <Layers>
            <Layer Material="Woods_grass" Depth="1"/>
            <Layer Material="Soil" Depth="5"/>
            <Layer Material="Stone" Depth="100"/>
          </Layers>
          <Slope Min="0" Max="25"/>
          <Latitude Min="-180" Max="180"/>
          <Longitude Min="-180" Max="180"/>
        </Rule>
        <Rule>
          <Layers>
            <Layer Material="Grass" Depth="1"/>
            <Layer Material="Soil" Depth="5"/>
            <Layer Material="Stone" Depth="100"/>
          </Layers>
          <Slope Min="25" Max="45"/>
        </Rule>
        <Rule>
          <Layers>
            <Layer Material="Rocks_grass" Depth="2"/>
            <Layer Material="Stone" Depth="100"/>
          </Layers>
          <Slope Min="45" Max="55"/>
        </Rule>
      </MaterialGroup>
This definition says what voxels should be generated in spots, that are painted with red channel value of 120. The rules in this definition will lead to following: Flat lands (up to 20 degrees slope) will have Wood grass 1 m thick, soil will be right under the WoodGrass up to 5 m depth and there will be stone underneath the soil. In places with medium slope, there is Grass instead of WoodGrass. And in slopes from 45 to 55 there is rocks grass 2 m thick with stone right away under it. With this technology, we can make the color react on its own to terrain bumps or even position on planet. This saves lots of meticulous painting with heightmap.
<Layer Material="Woods_grass" Depth="1"/><!-- Material refers to voxelmaterial definition. (You can find it in Content\Data\VoxelMaterials.sbc). Depth means how deep should the material go under ground. -->
<Slope Min="0" Max="25"/><!-- Slope of the terrain in degrees. -->
<Latitude Min="-180" Max="180"/><!-- Latitude in degrees. 0 degree is an equator. -->
<Longitude Min="-180" Max="180"/><!-- Longitude in degrees. 0 is in the middle of front planetary texture. (Fareon Kingdom) -->
Biomes definitions (trees, plants and bots)
Biomes refers to everything that is spawned on top of the planet. We use green channel of the material texture to set where all the terrain features appear and definitions in the Content\Data\Environment\ProceduralEnvironments.sbc to tell game which environment item should appear at specific green channel value. Also you need to assign Environment to planet in the Content\Data\PlanetGenerator.sbc in case you are adding a brand new planet.
Make or modify environment:
Go to Content\Data\Environment\ProceduralEnvironments.sbc
Procedural Environment definition
This definition defines where will the environmental items spawn and with which density. (note: bots are also considered environmental item). Best way to explain how procedural environment is working is to imagine that it puts spots on entire surface of a planet. And when you start defining trees, bots and bushes, the spots get “reserved” by these categories based on how many of those should appear in the world according to your mod. Spots are always different for each single planet. In order to mod the procedural environment, mod our “Earth Environment” definition. Or create your own but if you do, don’t forget to also mod PlanetGeneratorDefinition, so that planet has your new procedura environment assigned to it.
Definition elements explained
<!-- This part of definition is called ID. It says what type of definition this is <TypeID> and unique name of that definition <SubtypeID>. -->
  <Definition xsi:type="MyObjectBuilder_ProceduralWorldEnvironment">
    <Id>
      <TypeId>MyObjectBuilder_ProceduralWorldEnvironment</TypeId>
      <SubtypeId>Earth Environment</SubtypeId>
    </Id>


    <MaxSyncLod>1</MaxSyncLod><!-- This line defines how far away from player are the environmental items updating. This is important feature for optimization. -->
    <SectorSize>40</SectorSize><!-- This is size of the environmental sector. It is a different sector than the claimable areas by players. It sets size of one environmental sector.  -->
    <ItemsPerSqMeter>0.17</ItemsPerSqMeter><!-- The line sets overall maximum density of all environmental items. To return to analogy i used in the introduction, this number increases the amount of spots on the planet that are reserved for all environmental items. -->
    <ScanningMethod>Random</ScanningMethod>
    <ItemTypes Type="MyObjectBuilder_EnvironmentItemTypesDefinition" Subtype="Default"/><!-- This sets which types of environmental items are used in this procedural environment definition. This guide explains what are Environmental item types in the very next section. -->
    <ItemGroup Density=".017" Name="Bots" LodStart="1" LodEnd="1">
      <Mapping>
        <Material>Woods</Material>
        <Item Type="Bot" Subtype="Deer"/>
      </Mapping>
      <Mapping>
        <Biome>60</Biome>
        <Height Min="0" Max"1"/>
        <Latitude Min="-180" Max"180"/>
        <Longitude Min="-180" Max"180"/>
        <Slope Min="0" Max"1"/>
        <Item Type="Bot" Subtype="Deer" Density="0.9"/>
        <Item Type="Bot" Subtype="Barbarian" Density="0.1"/>
      </Mapping>
    </ItemGroup>

<!-- Item group is used to organize and better manage mappings. Mappings are definitions that actually add the environment items in the world. It is important to set Density correctly. Density (Density=".017") sets how many of the procedurally generated spots on the planet will be assigned to environmental items from this group. The name (Name="Bots") is only for naming purposes within definition and has no impact on the game. LodStart="1" and LodEnd="1" control how far from the player will the items appear. -->

    <Biome>60</Biome> <!-- This section means that Items within this mapping will only appear on spaces that are painted with green channel value 60 on the material map. -->
    <Material>Woods</Material> <!-- This means that the environmental items will only appear in the woods. -->
    <Height Min="0" Max"1"/> <!-- Sets in which altitude should these environmental items appear. If this parameter is missing, items spawn in full range (Min="0" Max"1") -->
    <Latitude Min="-180" Max"180"/> <!-- Sets at which latitude do the environment items spawn. If this parameter is missing, items spawn in full range (Min="-180" Max"180") -->
    <Longitude Min="-180" Max"180"/> <!-- Sets at which longitude the environment items spawn. If this parameter is missing, items spawn in full range (Min="-180" Max"180") -->
    <Slope Min="0" Max"90"/> <!-- Sets at which slopes the environment items spawn. If this parameter is missing, items spawn in full range (Min="0" Max"90") -->
    <ItemGroup Density=".085" Name="Trees" LodStart="-1" LodEnd="1">...</ItemGroup> <!-- LodStart="-1" means that the items will be visible all the time. Will not go into details about settings of this Item Group, since it more of the same. -->
    <ItemGroup Density=".36" Name="Small Items" LodStart="0" LodEnd="0">...</ItemGroup>
  </Definition>
Environment items
We learned how to assign environments to planets and how to mod environments themselves by changing densities and environment items. But we still don't know how to make the environment items themselves. Guides for those can be found on following links.
If you want to mod trees:
If you want to mod bushes and plants:
If you want to mod bots:
EnvironmentItemTypesDefinition
Here you define various types of items. Currently we have these types: Tree, Gatherable, Farmable, Static and Bot. Before you add any item, you must make sure it fits within these types of environment items or you created a new type for them.
  <Definition xsi:type="MyObjectBuilder_EnvironmentItemTypesDefinition">
    <Id Type="MyObjectBuilder_EnvironmentItemTypesDefinition" Subtype="Default"/>
    <Item Name="Tree">...</Item>
    <Item Name="Gatherable">...</Item>
    <Item Name="Farmable">... </Item>
    <Item Name="Static">...</Item>
    <Item Name="Bot">...</Item>
  </Definition>
EnvironmentItemTypes
    <Item Name="Tree">
      <ProxyActivationLod>0</ProxyActivationLod>
      <Provider Type="MyObjectBuilder_ProceduralEnvironmentModuleDefinition" Subtype="Growable"/><!-- This line adds ability to all environmental items of this type to grow. Keep in mind that the tree itself has to be setup properly in order for this to work. -->
      <Proxy Type="MyObjectBuilder_EnvironmentModuleProxyDefinition" Subtype="Gatherable" /><!-- This line adds ability to all environmental items of this type to use action “Gatherable”. Keep in mind that the tree itself has to be setup properly in order for this to work. -->
      <Proxy Type="MyObjectBuilder_EnvironmentModuleProxyDefinition" Subtype="Cuttable" /><!-- This line adds ability to all environmental items of this type to use action “Cuttable”. Keep in mind that the tree itself has to be setup properly in order for this to work. -->
      <Proxy Type="MyObjectBuilder_EnvironmentModuleProxyDefinition" Subtype="Farmable" /><!-- This line adds ability to all environmental items of this type to be farmable. Keep in mind that the tree itself has to be setup properly in order for this to work. -->
      <Proxy Type="MyObjectBuilder_EnvironmentModuleProxyDefinition" Subtype="Static" /><!-- This line adds basically adds items that do nothing. They are just visual props. Like some of our fern bushes. -->
      <Proxy Type="MyObjectBuilder_EnvironmentModuleProxyDefinition" Subtype="BotSpawner" /><!-- It is important that all environmental item types that will contain some bots have botspawner -->
      <ProxyActivationLod>0</ProxyActivationLod>This line says from which lod is the game logic attached to the environmental item. (when set on 0 only trees very close to you become “gatherable” and “cuttable”). This way we don’t use game logic on environmental items that couldn’t be used anyway and game is better optimized thanks to that.
    </Item>
Available proxy and providers:
Assign environment to a planet
Last thing is to assign your brand new procedural environment to a planet where it is supposed to appear. Go to Content\Data\PlanetGenerator.sbc and find definition of the planet you want your environment to be on. Then assign the environment to the planet by adding following line to the planet definition with name of your environment:
    <Environment>
      <TypeId>MyObjectBuilder_ProceduralWorldEnvironment</TypeId>
      <SubtypeId>NAMEOFYOURENVIRONMENTDEFINITION</SubtypeId>
    </Environment>
SutypeId refers to the name of the environment from: Content\Data\Environment\ProceduralEnvironments.sbc
Note: This is not necessary if you just modded existing vanilla environment and have not changed its SubtypeID
Ores definitions
Ores are placed using blue channel of the material texture to set where should ore deposits appear. When your ore deposits are painted on the material map, you need to define what ores will be there. Go to Content\Data\Environment\ProceduralEnvironments.sbc to tell game which ore should appear at specific blue channel value.
<OreMappings>
  <Ore Value="130" Type="IronOre_RichYield" Start="3" Depth="7" TargetColor="#b7340a" ColorInfluence="15 "/>
 <Ore Value="120" Type="IronOre_RegularYield" Start="3" Depth="7" TargetColor="#b75e0a" ColorInfluence="15" />
 <Ore Value="110" Type="IronOre_PoorYield" Start="2" Depth="5" TargetColor="#a76a41" ColorInfluence="15" />
</OreMappings>
The section you need to use is Ore Mappings.
<Ore Value="120" Type="IronOre_RegularYield" Start="3" Depth="7" TargetColor="#b75e0a" ColorInfluence="15" />
Value refers to blue channel value on material texture. Type refers to name of a voxel material from Content\Data\VoxelMaterials.sbc. Start is depth at which the ore deposit starts. Depth is how deep under ground it goes. TargetColor is color that will be used to color surface above the ore. ColorInfluence sets strenght of coloring.
View the full Planet Modding Guide


