Inventory and Crafting: Difference between revisions
CptTwinkie (talk | contribs) (Created page with "{{Draft}} Category:How To Play") |
CptTwinkie (talk | contribs) mNo edit summary Tag: SEO |
||
| (13 intermediate revisions by the same user not shown) | |||
| Line 1: | Line 1: | ||
{{ | {{SEO|image_url=http://www.medievalengineerswiki.com/images/9/99/Inventory1.png|description=Inventory and Crafting are part of a single whole in Medieval Engineers. Crafting cannot work without an inventory and so the screen is shared between them. In a technical sense, inventory works as a container with a number of slots.}} | ||
{{BigThumb|Inventory1.png|External Inventory of {{Small_Image_Link|WoodChest.png|Small Chest}}}} | |||
{{Version <!-- Do not change the version until the entire page is up-to-date --> | |||
|release=0|major=6|minor=3}} | |||
[[Category: | |||
[[Inventory and Crafting]] are part of a single whole in Medieval Engineers. Crafting cannot work without an inventory and so the screen is shared between them. In a technical sense, inventory works as a container with a number of slots. These slots can be filled with [[:Category:Inventory/Items|Inventory Items]] or ''stacks'' of inventory items. What exactly defines an inventory item and whether or not it stacks is more of a technical matter suited to modding than to how to use inventory. In a practical sense, nearly everything can be placed in inventory or broken down into something that can. [[:Category:Large Blocks|Large Blocks]], large trees, and the ground itself are examples of things that cannot be placed into inventory without modifying them in some way. | |||
Items that can go into inventory can be picked up by aiming at them and pressing or holding {{Key|f}}. For most loose items, pressing {{Key|f}} will pick them up. For items attached to things, holding {{Key|f}} is usually required. These actions are not uniform for both technical and gameplay reasons. If you build a cart, you don't want to destroy it by accidentally tapping the wrong key. | |||
Most external inventories have constraints placed upon them that restrict the types of items that can be placed there. These constraints vary greatly for each inventory container. See [[:Category:Inventory/Blocks]] for specifics on any particular block. | |||
Crafting, in the simplest terms, is a method of turning inventory items into other inventory items. Which items can be turned into other items is limited by which crafting recipes you have [[Research]]ed and unlocked in your world. Crafting recipes are tied to specific [[:Category:Crafting/Blocks|Crafting Stations]] (blocks that craft items) or to the [[Character]] directly. | |||
==External Inventory== | |||
<!-- keys, view, transfer --> | |||
{{Justify|In addition to the personal inventory of the character, there are also external inventories. These exist for certain [[:Category:Inventory|inventory blocks]] and [[:Category:Characters and NPCs|NPCs]]. External inventories can be accessed by aiming at the block or NPC with the inventory and pressing {{Key|f}}. Usually, the block or NPC will have a highlight when you aim at it indicating that it is interactive. | |||
When you access an external inventory you will see both your personal inventory in addition to the external inventory that you have accessed. You can transfer items between inventories using a few methods. The first and simplest method is by dragging items from one inventory to the other. This puts the item exactly where you drop it. You can also transfer items by double-clicking ({{Key|lmb}}{{Key|lmb}}) on them. This put them in the first stack of like items, assuming it's not full, or in the first open slot available. This method is also not very complicated but it does have some drawbacks in crafting inventories.}} | |||
There are other transfer options using modifier keys: | |||
{{Key|shift}} + {{Key|lmb}}: Move all items of selected type to the next inventory. | |||
{{Key|control}} + {{Key|lmb}}: Move half of the item stack to the next inventory. | |||
{{Key|alt}} + {{Key|lmb}}: Move one item from stack to the next inventory. | |||
{{Key|rmb}} drag: Move half of the item stack. | |||
{{Key|control}} + {{Key|rmb}} drag: Drag an item and enter the amount to move. | |||
These shortcuts can be viewed at any time in the game by clicking the [[File:HelpIconColored.png|20px|frameless|text-bottom]] symbol in an inventory screen. | |||
Items can be dropped on the ground from the inventory using the [[File:Inventory4.png|20px|frameless]] drop button. Either drag the item to the button or select the item and click the button. | |||
{{ClearLine}} | |||
==Personal Inventory and Crafting== | |||
{{BigThumb|Inventory2.png|Personal Inventory and Crafting Screen}} | |||
{{Justify|You can access your personal inventory and crafting screen by pressing {{Key|i}} by default. When you do you will see the character's personal inventory on the right side. On the left side you will see the personal crafting screen. The character is able to craft some simple items unaided by a crafting station. | |||
The crafting screen may appear complex at first sight but it is actually rather simple in its function. At the top left under "Select items to craft" there are crafting recipes that are available at this time. You may notice that some or all of them are red in color. This indicates that, although the recipe is unlocked, you lack sufficient resources in your inventory to craft the recipe. | |||
If you click on a recipe you will see items appear in the "Requirements" section. These are the ingredients needed to craft the recipe. They also appear red in color if the ingredients are missing. Once you add all of the ingredients the Requirements and the recipe will no longer appear red. You can then click the Craft button to begin crafting the recipe. The required ingredients will be removed from your inventory and the recipe will show in the "Progress" box. You will notice that a brown highlight will begin filling the progress box from left to right. When the highlight reaches the right side the craft will be complete and the new item(s) will appear in your inventory. This basic progress is how all crafting is done. | |||
You can cancel a craft that is in progress by using {{Key|rmb}} on the progress box. The requirements will be returned to the character's personal inventory. | |||
There is a crafting queue at the bottom of the crafting screen. If you attempt to craft a recipe while another recipe is already in progress the second recipe will be added to the queue. If add a third recipe that is the same as the one in the queue it will stack on the queued recipe. If you add a recipe that differs from the one in the queue it will take a new slot in the queue. In this way, you can craft a large number of duplicates but only a total of five differing recipes at one time. Items in the queue can be removed by using {{Key|rmb}} upon them. There is no way to re-order the queue at this time. To change the crafting order, remove the recipes and add them again in the new order.}} | |||
Like the inventory there are additional control options: | |||
{{Key|lmb}}{{Key|lmb}} recipe: Add recipe to queue. | |||
{{Key|control}} + {{Key|lmb}}{{Key|lmb}}: Add recipe to queue 5 times. | |||
{{Key|shift}} + {{Key|lmb}}{{Key|lmb}}: Add recipe to queue 10 times. | |||
{{Key|shift}} + {{Key|control}} + {{Key|lmb}}{{Key|lmb}}: Add recipe to queue 15 times. | |||
These modifiers also work for the craft button but only a single {{Key|lmb}} is required. This makes it faster when queing many items. | |||
{{Key|alt}} + {{Key|rmb}} production queue: Remove one item from a queue stack. | |||
These shortcuts can be viewed at any time in the game by clicking the [[File:HelpIconColored.png|20px|frameless|text-bottom]] symbol in a crafting screen. | |||
{{ClearLine}} | |||
==External Inventory and Crafting== | |||
{{BigThumb|Inventory3.png|External Inventory and Crafting of {{Small_Image_Link|WoodTable.png|Crafting Table}}}} | |||
<!-- transfer differences, crafting differences --> | |||
{{Justify|In addition to the personal crafting of the character, there are also external crafting stations. These exist for certain [[:Category:Crafting/Blocks|crafting stations]]. External inventories can be accessed by aiming at the crafting block and pressing {{Key|f}}. Usually, the block will have a highlight when you aim at it indicating that it is interactive. | |||
When you access a crafting station's inventory you will see both your personal inventory in addition to the external inventory that you have accessed on the right. On the left you will see the crafting station's crafting screen. There are two varieties of crafting stations. These are powered and un-powered. | |||
Un-powered crafting stations, like the {{Small_Image_Link|WoodTable.png|Crafting Table}} and {{Small_Image_Link|Smithy.png|Smithy}}, function the same as personal crafting with one exception. Since the crafting station has its own inventory, that inventory must be used for crafting. You will have to transfer requirements into the crafting station in order to craft the recipes there. | |||
Powered crafting stations have additional differences from those of un-powered crafting stations. Powered crafting stations require a form of power, as the name implies. In the more basic powered crafting stations, such as the {{Small_Image_Link|BonFire.png|Campfire}}, this power is provided by fuel. These stations have two inventories, a crafting inventory and a fuel inventory. [[Category:Fuel|Fuel]] must be placed in the fuel inventory or the station will not craft. Additionally, there is a "Fuel" box on the crafting screen and a Light button. While crafting, the currently burning fuel will be displayed in the fuel box with a highlight that moves from left to right, not unlike the Progress box. This represents the fuel being consumed. Once a fuel is added the fuel box it is not retrievable. The Light button will become a Douse button while the fires burn in the crafting station. Clicking Douse will douse the fire or, to say it differently, it will put the fire out. Clicking light will start the fire again. For convenience, when a recipe is added to crafting, the fire will be automatically lit if there is fuel available. Also for convenience, if recipes are queued for crafting and there is no fuel, the fire will be automatically lit when fuel is added to the Fuel inventory. | |||
Many powered crafting stations have three inventories, such as the {{Small_Image_Link|ClayFurnace.png|Furnace}}. Rather than a single Crafting inventory, these stations have an Input inventory and an Output inventory. This works in a somewhat intuitive manner, where Requirements are placed in the Input inventory and recipe results are placed in the Output inventory after crafting. | |||
There are other, more advanced, powered crafting stations, the [[:Category:Mechanical Blocks/Power Sinks|mechanical crafting stations]]. Mechanical crafting stations do not use fuel but require mechanical power instead. As a result, they have no Fuel inventory and no Fuel box. They also do not have a crafting screen at all. Mechanical blocks instead have a Toolhead inventory. [[:Category:Mechanical Blocks/Toolheads|Toolheads]] are tools that are placed in mechanical crafting stations. They have a built-in crafting recipe and so only make a single recipe. To choose a different recipe for a mechanical crafting station you must craft a different toolhead and place it in the Toolhead inventory. Mechanical crafting stations work automatically when they have power. As long as there are Requirements in the Input inventory the mechanical crafting station will continue crafting. Toolheads, like other tools in the game, have durability and they wear out over time. Toolheads do not have a broken item state however. When they wear out they disappear completely. This makes the convenience of mechanical crafting a little more costly. | |||
One caveat of having multiple inventories in a single block is that it creates complications for inventory transfers. When using {{Key|lmb}}{{Key|lmb}} to move an item to a block with multiple inventories it will try to add it to the first inventory, in order, that will accept the item based on the inventory's constraint. If you are unfamiliar with the constrained items for a particular inventory this can be confusing at first. The constraints are set so that, in most cases, common fuels will not be accepted into the Crafting inventory. That way using {{Key|lmb}}{{Key|lmb}} on the fuel will transfer it to the Fuel inventory. There are exceptions though and those are the cases that will sometimes genuinely confuse players. Just remember that if a fuel doesn't go into the Fuel inventory when you use {{Key|lmb}}{{Key|lmb}} on it, that doesn't mean it won't accept it. If an item works as fuel then it can be used as fuel anywhere. You may have to simply drag it into the Fuel inventory.}} | |||
[[Category:Non-HUD Screens]] | |||
[[Category:Crafting]] | |||
Latest revision as of 15:25, 4 June 2018
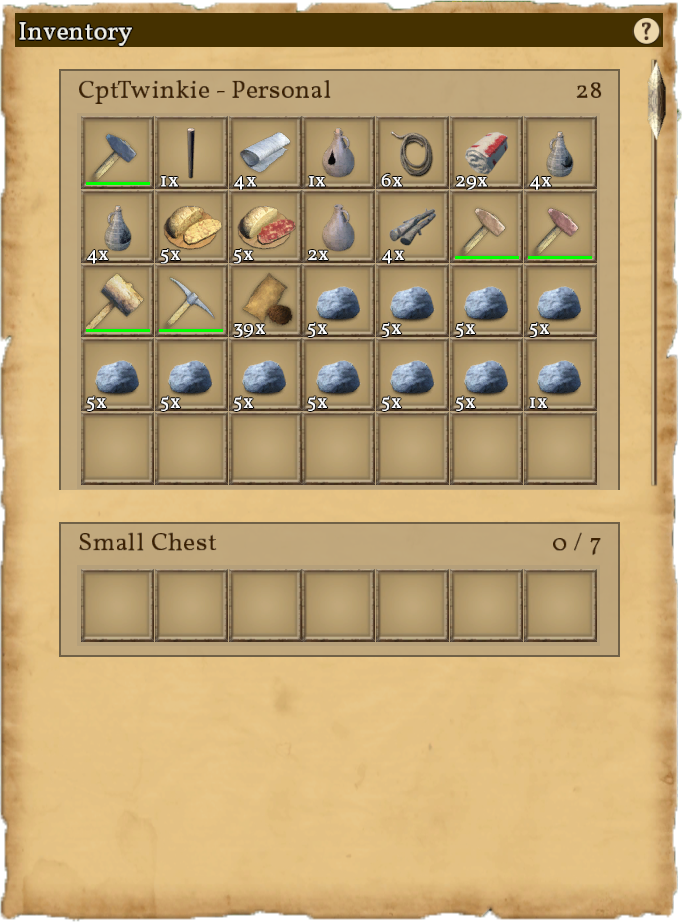
 Small Chest
| Version: | 0.6.3 |
Inventory and Crafting are part of a single whole in Medieval Engineers. Crafting cannot work without an inventory and so the screen is shared between them. In a technical sense, inventory works as a container with a number of slots. These slots can be filled with Inventory Items or stacks of inventory items. What exactly defines an inventory item and whether or not it stacks is more of a technical matter suited to modding than to how to use inventory. In a practical sense, nearly everything can be placed in inventory or broken down into something that can. Large Blocks, large trees, and the ground itself are examples of things that cannot be placed into inventory without modifying them in some way.
Items that can go into inventory can be picked up by aiming at them and pressing or holding ![]() . For most loose items, pressing
. For most loose items, pressing ![]() will pick them up. For items attached to things, holding
will pick them up. For items attached to things, holding ![]() is usually required. These actions are not uniform for both technical and gameplay reasons. If you build a cart, you don't want to destroy it by accidentally tapping the wrong key.
is usually required. These actions are not uniform for both technical and gameplay reasons. If you build a cart, you don't want to destroy it by accidentally tapping the wrong key.
Most external inventories have constraints placed upon them that restrict the types of items that can be placed there. These constraints vary greatly for each inventory container. See Category:Inventory/Blocks for specifics on any particular block.
Crafting, in the simplest terms, is a method of turning inventory items into other inventory items. Which items can be turned into other items is limited by which crafting recipes you have Researched and unlocked in your world. Crafting recipes are tied to specific Crafting Stations (blocks that craft items) or to the Character directly.
External Inventory
There are other transfer options using modifier keys:
![]() +
+ ![]() : Move all items of selected type to the next inventory.
: Move all items of selected type to the next inventory.
![]() +
+ ![]() : Move half of the item stack to the next inventory.
: Move half of the item stack to the next inventory.
![]() +
+ ![]() : Move one item from stack to the next inventory.
: Move one item from stack to the next inventory.
![]() drag: Move half of the item stack.
drag: Move half of the item stack.
![]() +
+ ![]() drag: Drag an item and enter the amount to move.
drag: Drag an item and enter the amount to move.
These shortcuts can be viewed at any time in the game by clicking the ![]() symbol in an inventory screen.
symbol in an inventory screen.
Items can be dropped on the ground from the inventory using the ![]() drop button. Either drag the item to the button or select the item and click the button.
drop button. Either drag the item to the button or select the item and click the button.
Personal Inventory and Crafting
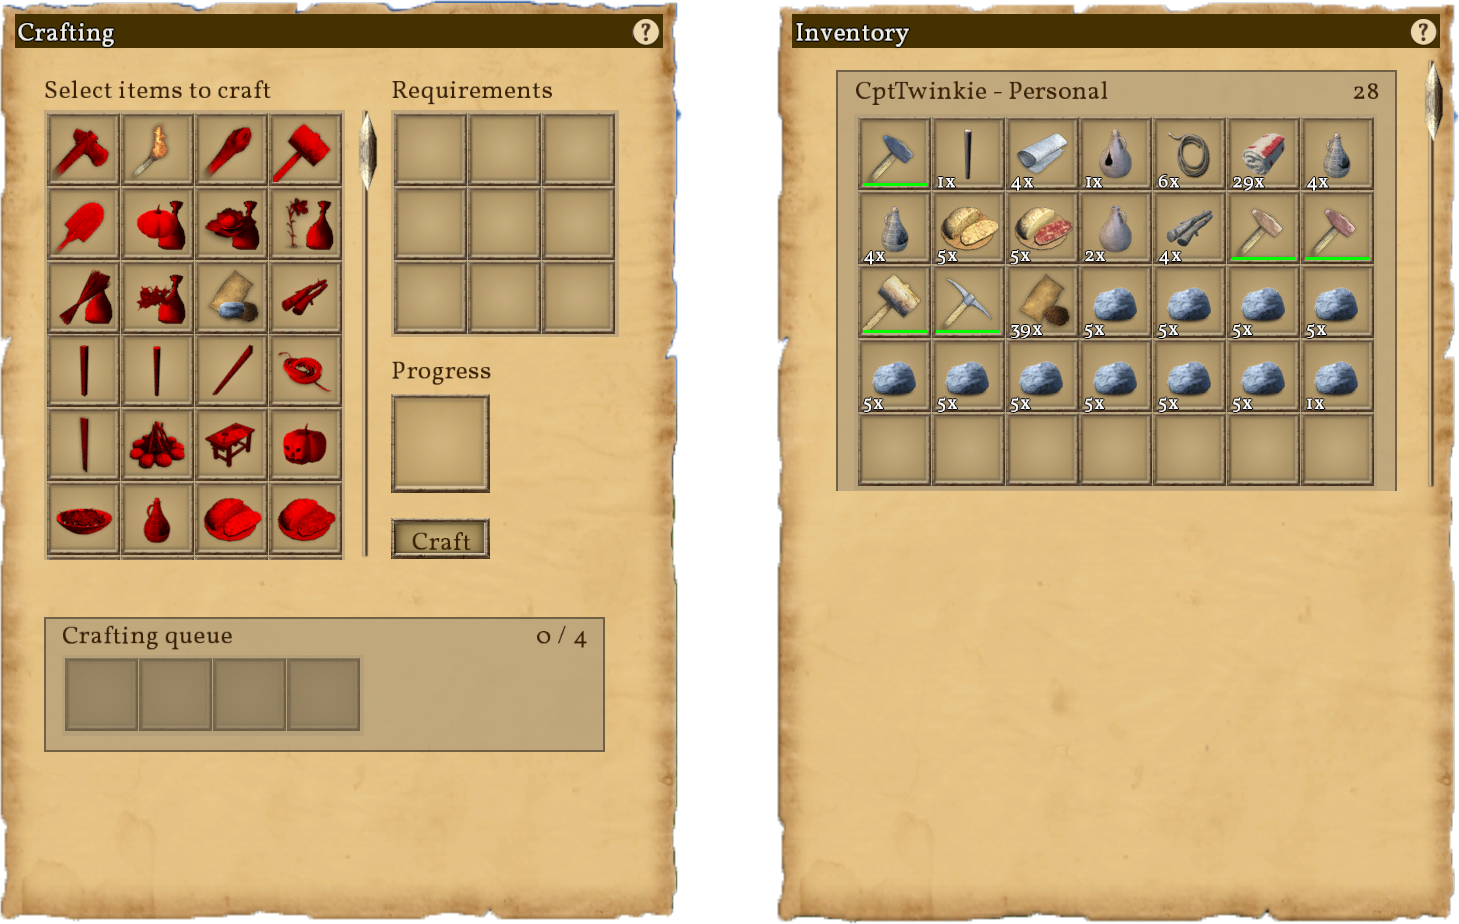
The crafting screen may appear complex at first sight but it is actually rather simple in its function. At the top left under "Select items to craft" there are crafting recipes that are available at this time. You may notice that some or all of them are red in color. This indicates that, although the recipe is unlocked, you lack sufficient resources in your inventory to craft the recipe.
If you click on a recipe you will see items appear in the "Requirements" section. These are the ingredients needed to craft the recipe. They also appear red in color if the ingredients are missing. Once you add all of the ingredients the Requirements and the recipe will no longer appear red. You can then click the Craft button to begin crafting the recipe. The required ingredients will be removed from your inventory and the recipe will show in the "Progress" box. You will notice that a brown highlight will begin filling the progress box from left to right. When the highlight reaches the right side the craft will be complete and the new item(s) will appear in your inventory. This basic progress is how all crafting is done.
You can cancel a craft that is in progress by using ![]() on the progress box. The requirements will be returned to the character's personal inventory.
on the progress box. The requirements will be returned to the character's personal inventory.
Like the inventory there are additional control options:
![]()
![]() recipe: Add recipe to queue.
recipe: Add recipe to queue.
![]() +
+ ![]()
![]() : Add recipe to queue 5 times.
: Add recipe to queue 5 times.
![]() +
+ ![]()
![]() : Add recipe to queue 10 times.
: Add recipe to queue 10 times.
![]() +
+ ![]() +
+ ![]()
![]() : Add recipe to queue 15 times.
: Add recipe to queue 15 times.
These modifiers also work for the craft button but only a single ![]() is required. This makes it faster when queing many items.
is required. This makes it faster when queing many items.
![]() +
+ ![]() production queue: Remove one item from a queue stack.
production queue: Remove one item from a queue stack.
These shortcuts can be viewed at any time in the game by clicking the ![]() symbol in a crafting screen.
symbol in a crafting screen.
External Inventory and Crafting
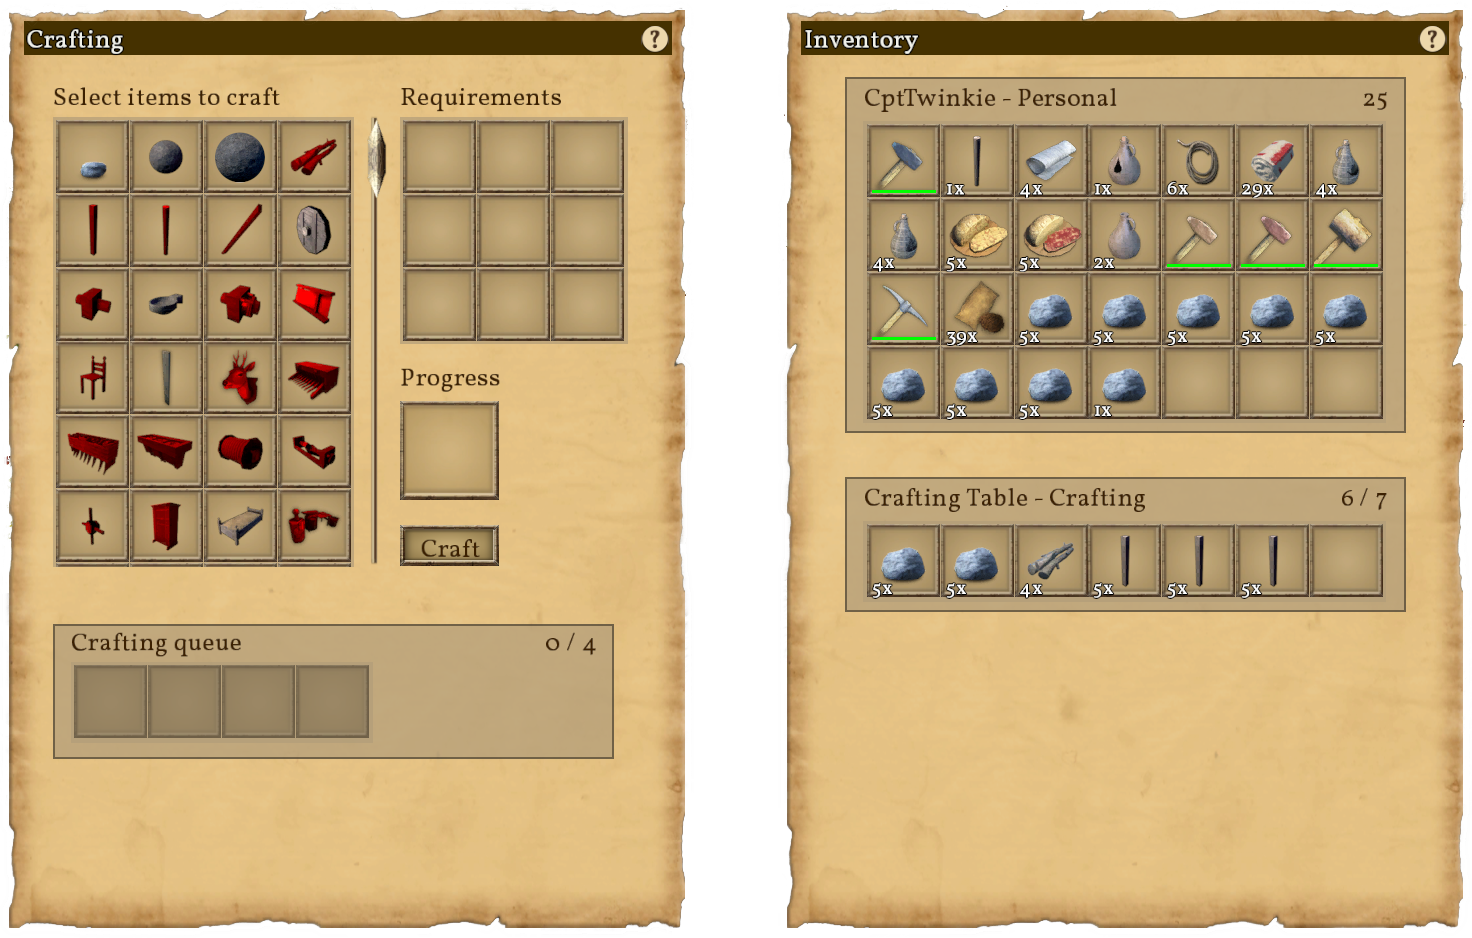
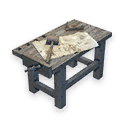 Crafting Table
When you access a crafting station's inventory you will see both your personal inventory in addition to the external inventory that you have accessed on the right. On the left you will see the crafting station's crafting screen. There are two varieties of crafting stations. These are powered and un-powered.
Un-powered crafting stations, like the ![]() Crafting Table and
Crafting Table and ![]() Smithy, function the same as personal crafting with one exception. Since the crafting station has its own inventory, that inventory must be used for crafting. You will have to transfer requirements into the crafting station in order to craft the recipes there.
Smithy, function the same as personal crafting with one exception. Since the crafting station has its own inventory, that inventory must be used for crafting. You will have to transfer requirements into the crafting station in order to craft the recipes there.
Powered crafting stations have additional differences from those of un-powered crafting stations. Powered crafting stations require a form of power, as the name implies. In the more basic powered crafting stations, such as the ![]() Campfire, this power is provided by fuel. These stations have two inventories, a crafting inventory and a fuel inventory. must be placed in the fuel inventory or the station will not craft. Additionally, there is a "Fuel" box on the crafting screen and a Light button. While crafting, the currently burning fuel will be displayed in the fuel box with a highlight that moves from left to right, not unlike the Progress box. This represents the fuel being consumed. Once a fuel is added the fuel box it is not retrievable. The Light button will become a Douse button while the fires burn in the crafting station. Clicking Douse will douse the fire or, to say it differently, it will put the fire out. Clicking light will start the fire again. For convenience, when a recipe is added to crafting, the fire will be automatically lit if there is fuel available. Also for convenience, if recipes are queued for crafting and there is no fuel, the fire will be automatically lit when fuel is added to the Fuel inventory.
Campfire, this power is provided by fuel. These stations have two inventories, a crafting inventory and a fuel inventory. must be placed in the fuel inventory or the station will not craft. Additionally, there is a "Fuel" box on the crafting screen and a Light button. While crafting, the currently burning fuel will be displayed in the fuel box with a highlight that moves from left to right, not unlike the Progress box. This represents the fuel being consumed. Once a fuel is added the fuel box it is not retrievable. The Light button will become a Douse button while the fires burn in the crafting station. Clicking Douse will douse the fire or, to say it differently, it will put the fire out. Clicking light will start the fire again. For convenience, when a recipe is added to crafting, the fire will be automatically lit if there is fuel available. Also for convenience, if recipes are queued for crafting and there is no fuel, the fire will be automatically lit when fuel is added to the Fuel inventory.
Many powered crafting stations have three inventories, such as the ![]() Furnace. Rather than a single Crafting inventory, these stations have an Input inventory and an Output inventory. This works in a somewhat intuitive manner, where Requirements are placed in the Input inventory and recipe results are placed in the Output inventory after crafting.
Furnace. Rather than a single Crafting inventory, these stations have an Input inventory and an Output inventory. This works in a somewhat intuitive manner, where Requirements are placed in the Input inventory and recipe results are placed in the Output inventory after crafting.
There are other, more advanced, powered crafting stations, the mechanical crafting stations. Mechanical crafting stations do not use fuel but require mechanical power instead. As a result, they have no Fuel inventory and no Fuel box. They also do not have a crafting screen at all. Mechanical blocks instead have a Toolhead inventory. Toolheads are tools that are placed in mechanical crafting stations. They have a built-in crafting recipe and so only make a single recipe. To choose a different recipe for a mechanical crafting station you must craft a different toolhead and place it in the Toolhead inventory. Mechanical crafting stations work automatically when they have power. As long as there are Requirements in the Input inventory the mechanical crafting station will continue crafting. Toolheads, like other tools in the game, have durability and they wear out over time. Toolheads do not have a broken item state however. When they wear out they disappear completely. This makes the convenience of mechanical crafting a little more costly.